
A kitchen remodel can go sideways fast when you’re juggling demolition timelines, appliance orders, and contractor schedules without a clear plan. That’s exactly why having a kitchen remodel checklist matters, it keeps every decision, purchase, and phase organized so nothing falls through the cracks. Without one, homeowners often end up with costly delays and budget overruns that could have been prevented with better sequencing.
At Fenelon Handyman Services, we’ve helped Tampa homeowners through kitchen renovations since 2014, and we’ve seen firsthand what happens when steps get skipped or done out of order. Cabinets showing up before the plumbing is roughed in, countertops measured before the old layout is removed, these mistakes eat into your budget and push back your timeline. Our experience across hundreds of local kitchen projects shaped the guide you’re about to read.
This article walks you through every stage of a kitchen remodel in the correct sequence, from initial planning and budgeting through demolition, construction, and final walkthrough. Follow it start to finish, and you’ll have a clear roadmap to keep your renovation on track and your spending under control.
What this checklist covers and how to use it
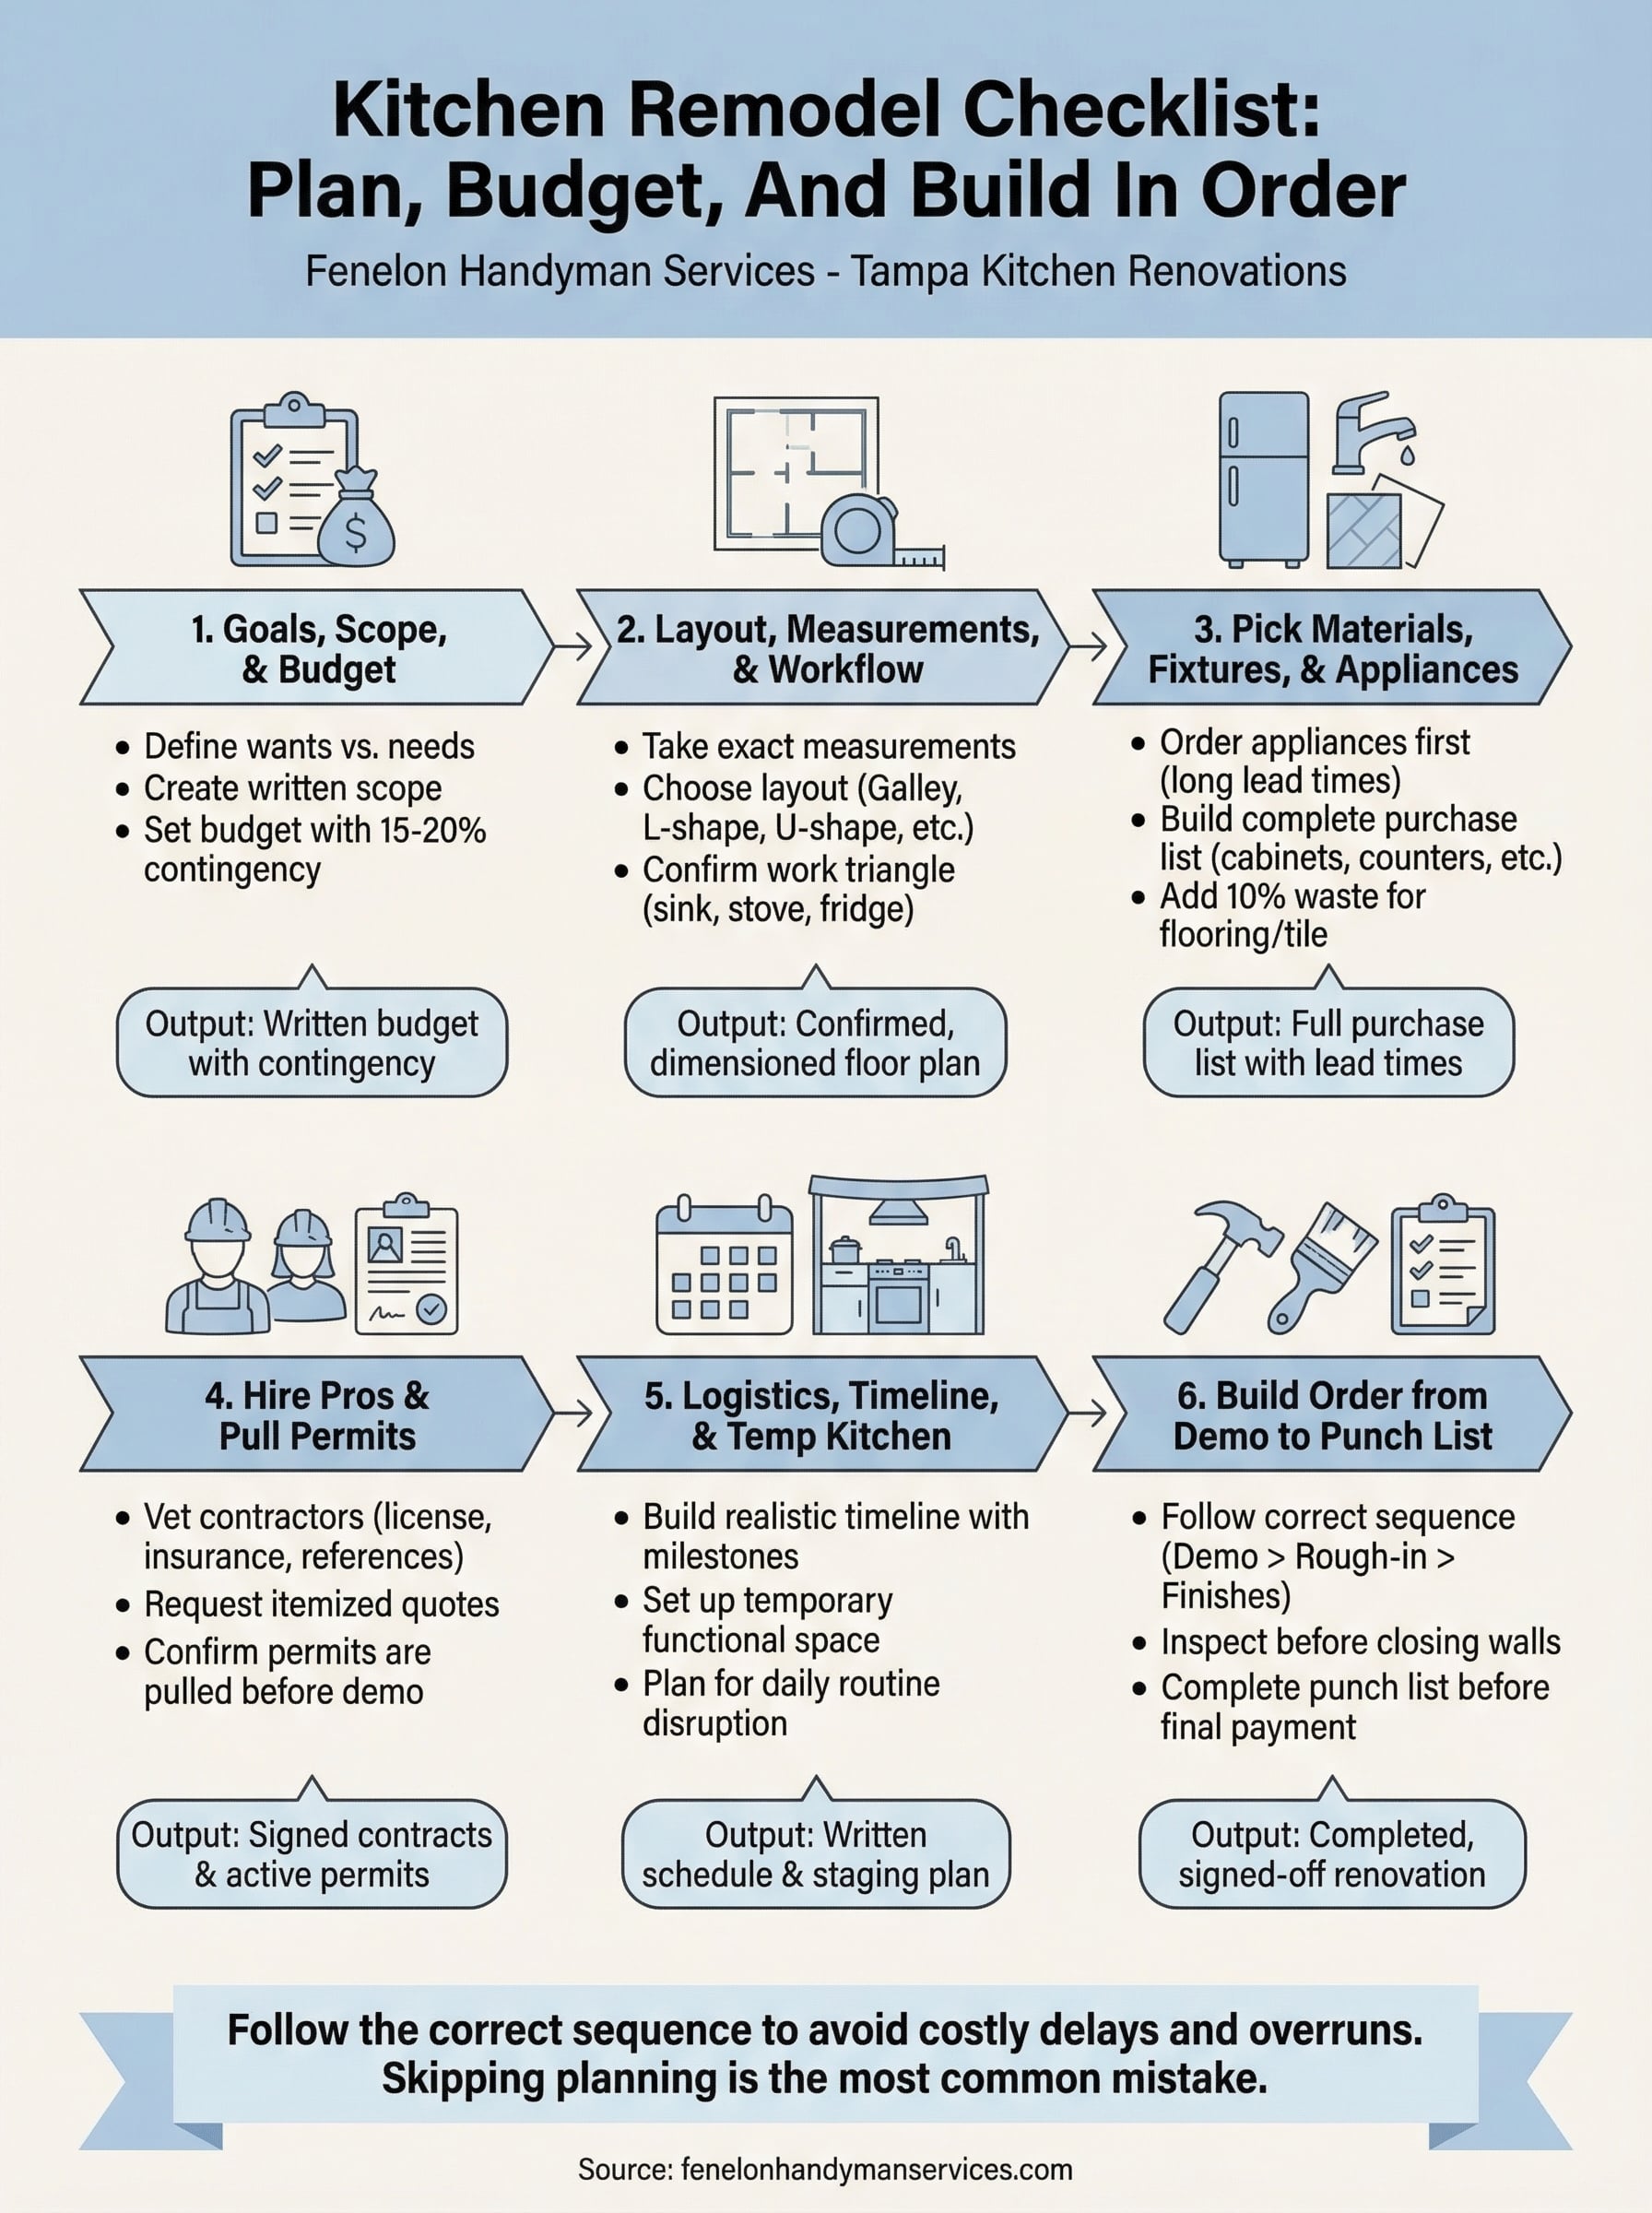
This kitchen remodel checklist breaks the entire renovation process into six sequential steps, each covering a distinct phase of the project. You’ll move from goal-setting and budgeting through layout planning, material selection, hiring, logistics, and finally the physical build itself. Every step is ordered the way professionals actually sequence work, so you avoid the common mistake of making decisions too late or purchasing materials before your measurements are confirmed.
Skipping the planning steps is the single most common reason kitchen remodels run over budget and over schedule.
What the checklist includes
Each step in this guide covers a specific category of decisions and tasks you need to complete before moving to the next phase. This is not a general overview; it gives you concrete actions, questions to answer, and things to verify at each stage before advancing. Here’s a summary of what each step addresses:
| Step | Focus Area | Key Output |
|---|---|---|
| 1 | Goals, scope, and budget | Written budget with a contingency line |
| 2 | Layout, measurements, and workflow | Confirmed and dimensioned floor plan |
| 3 | Materials, fixtures, and appliances | Full purchase list with lead times noted |
| 4 | Hiring pros and pulling permits | Signed contracts and active permits |
| 5 | Logistics, timeline, and temp kitchen | Written schedule and staging plan |
| 6 | Build order from demo to punch list | Completed, signed-off renovation |
How to use this guide
Work through each step in the order it appears, not in whatever order seems most convenient at the time. The sequence is intentional. For example, you need your layout confirmed and fully measured before you order cabinets, and cabinets need to be ordered before your countertop fabricator can come out to template. Jumping ahead creates rework, wasted deposits, and avoidable delays.
Before you start, set aside a dedicated folder, either physical or digital, where you store quotes, receipts, measurements, permit documents, and contractor contact information. Having everything in one place saves hours of back-and-forth and keeps you in control of the project. At the end of each step, review the checklist items before moving forward. If anything on a given step remains incomplete, finish it before advancing.
You can also use this guide alongside a professional contractor. Share the relevant sections with whoever you hire so your expectations and their workflow are aligned from day one. When everyone operates from the same sequence, scheduling conflicts and miscommunications drop significantly, and your project moves faster.
Step 1. Define goals, scope, and budget
Before you order a single item or contact a contractor, write down exactly what you want from this remodel. Skipping this step means you’ll make expensive decisions without a clear reference point, and scope creep will quietly push your costs higher than planned.
Set your goals and scope first
Start by separating your wants from your needs. A need addresses a functional problem, like broken cabinets, outdated wiring, or a layout that blocks traffic flow. A want is an upgrade that improves the space but isn’t urgent, like a kitchen island or premium backsplash tile. Writing both lists down helps you make smarter trade-offs when the budget gets tight.
Defining scope before talking to contractors protects you from quotes that include work you never actually wanted.
Once you have both lists, decide which want items are firm priorities and which you can defer. This produces your project scope, a clear written description of everything the remodel includes and, just as importantly, everything it excludes.
Build your budget with a contingency
Use this simple budget template to structure your numbers before you talk to anyone:
| Budget Category | Estimated Cost | Notes |
|---|---|---|
| Cabinets | $ | Include hardware |
| Countertops | $ | Confirm after cabinet order |
| Appliances | $ | Check lead times |
| Flooring | $ | Add 10% for waste |
| Labor | $ | Get 3 quotes |
| Permits and fees | $ | Varies by county |
| Contingency (15-20%) | $ | Non-negotiable line item |
Set a hard upper limit on your total spend before you get any quotes. A 15-20% contingency is standard in Tampa because older homes often hide water damage, outdated wiring, or mold behind walls that only surface once demolition starts. If you don’t use the contingency, that’s fine, but you need it in the plan from day one.
Step 2. Measure, choose layout, and plan workflow
Your measurements drive every purchase decision in this remodel. Incorrect dimensions lead to cabinets that don’t fit, countertops cut to the wrong size, and appliances that can’t clear the doorway. Record your numbers before you commit to any layout or contact any supplier.
Take accurate measurements before anything else
Pull out a tape measure and record your kitchen’s exact dimensions, including wall lengths, ceiling height, window and door locations, and the rough-in positions for your plumbing and electrical outlets. Write every number down with a hand-drawn floor plan, even a rough sketch works. You need these figures on paper before your contractor visits so the conversation starts with real data, not estimates.
Use this measurement checklist before moving forward:
- Overall room dimensions (length x width)
- Ceiling height
- Window rough opening: width, height, and distance from floor
- Door rough opening: width and swing direction
- Plumbing supply and drain locations
- Electrical outlet positions
- Gas line location if applicable
Choose a layout that matches how you cook
Your layout determines daily usability and traffic flow more than any finish material will. The five standard options are galley, L-shape, U-shape, one-wall, and island. Match the layout to your room’s square footage and to how many people typically work in the space at once. Lock this decision down before you contact a cabinet supplier.

Your layout choice determines your entire cabinet run, so changing it after ordering cabinets means losing your deposit.
Confirm your work triangle
The work triangle connects your sink, stove, and refrigerator along the path you travel constantly while cooking. Each leg should measure between 4 and 9 feet, and no cabinet run or island should interrupt it. Checking this as part of your kitchen remodel checklist now prevents functional problems that cost significantly more to fix after cabinets are installed.
Add the confirmed layout and a dimensioned floor plan to your project folder before moving to Step 3.
Step 3. Pick materials, fixtures, and appliances early
Most homeowners treat material selection as something they can handle later, but late decisions are one of the top reasons kitchen projects stall mid-construction. Locking in your materials, fixtures, and appliances before demo day means your contractor always has what they need to keep moving, and you avoid paying crews to stand around waiting on a delayed delivery.
Order appliances first
Appliances carry the longest lead times of anything in your kitchen, often six to twelve weeks for custom sizes or specialty finishes. Order them the moment your layout is confirmed. A refrigerator that arrives two weeks after your cabinets are installed is a manageable delay, but one that arrives six weeks late puts your entire project on hold.
Lock in your appliance order before you finalize cabinet dimensions, since cabinet runs are built around appliance cutout sizes.
When you place your appliance order, record the model number, delivery date, and cutout dimensions for each unit in your project folder. Your cabinet supplier and contractor both need those cutout specs before they start any work.
Build a complete materials list
Your kitchen remodel checklist should include a line item for every material before you step into a showroom or browse online. Use this template to track each selection and its lead time:
| Item | Selection Made | Supplier | Lead Time | Ordered |
|---|---|---|---|---|
| Cabinets | ||||
| Countertop material | ||||
| Backsplash tile | ||||
| Flooring | ||||
| Sink and faucet | ||||
| Lighting fixtures | ||||
| Cabinet hardware |
Fill out every row before you move to Step 4. Missing even one item, like forgetting to order cabinet hardware, can delay your installer by days. Add 10% to your tile and flooring quantities to account for cuts and breakage during installation.
Step 4. Hire the right pros and pull permits
Your materials list and confirmed layout give contractors the specific information they need to provide accurate quotes. Without those details in hand, you’ll receive estimates with wide price ranges that are nearly impossible to compare. Contact at least three licensed and insured contractors, share your scope of work, your floor plan, and your appliance cutout specs, and request itemized written quotes so you can see exactly what each one includes.
Vet contractors before you sign anything
Checking a contractor’s credentials takes less than an hour and protects you from significant financial risk. Verify their state license and insurance coverage directly through Florida’s Department of Business and Professional Regulation before you sign anything. Ask each candidate for references from kitchen projects completed in the past 12 months, then actually call those references and ask specific questions about how the contractor handled unexpected problems, not just whether the finished project looked good.
Use this quick vetting checklist before hiring anyone on your kitchen remodel checklist:
- License number verified through Florida DBPR
- General liability insurance certificate on file
- Workers’ compensation coverage confirmed
- Three recent kitchen references contacted
- Itemized quote received in writing
- Payment schedule reviewed (never pay more than 10-15% upfront)
A contractor who resists pulling permits is signaling that their work may not pass inspection, which creates problems when you sell the home.
Pull permits before demolition starts
Most kitchen remodels in Tampa require building permits for electrical, plumbing, and structural work. Your contractor typically handles the permit application, but confirming this responsibility is yours before you sign the contract. Ask directly which permits apply to your project and who files for each one. Permit timelines vary by county, so factor two to four weeks for approval into your project schedule. Work that starts without the correct permits can force you to open walls for inspection after the fact, which adds both cost and time to your renovation.
Step 5. Set logistics, timeline, and a temp kitchen
Before demolition starts, you need a written project schedule and a clear plan for how your household will function during the build. Skipping this step leaves you scrambling for meals, storage, and contractor access every single day of the renovation. Locking down logistics now means your project runs on a predictable schedule instead of a reactive one.
A written timeline shared with every contractor on your project eliminates the single biggest source of scheduling conflicts.
Build a realistic project timeline
Work backward from your target completion date to set milestones for each phase. Ask every contractor you’ve hired for their estimated duration, then add buffer days between trades to account for inspections, material deliveries, and any rework. A typical Tampa kitchen remodel runs four to eight weeks depending on scope, but your timeline depends on the specific work involved.
Use this template to map your phases before demo day:
| Phase | Start Date | End Date | Contractor/Owner | Notes |
|---|---|---|---|---|
| Permit approval | Owner | Confirm before scheduling demo | ||
| Demolition | GC | Verify appliance removal plan | ||
| Rough electrical and plumbing | Licensed trades | Inspection required before closing walls | ||
| Drywall and flooring prep | GC | |||
| Cabinet installation | Cabinet installer | Confirm delivery date first | ||
| Countertop templating and install | Fabricator | Happens after cabinets are set | ||
| Appliance installation | GC or plumber | |||
| Backsplash and finish work | GC | |||
| Final inspection and punch list | GC and owner |
Add this schedule to your kitchen remodel checklist folder and share a copy with every contractor before work begins.
Set up a temporary kitchen before demo day
Your kitchen will be completely unusable for weeks, so setting up a functional temporary space before demolition protects your daily routine and keeps you from eating out for every meal. Move a microwave, coffee maker, mini fridge, and a two-burner hot plate to another room. Set up a folding table for prep work and keep paper plates and easy-prep food stocked so meals stay manageable throughout the build.
Step 6. Build in order from demo to punch list
The physical build sequence is not flexible. Each trade depends on the work completed before it, and starting any phase out of order creates rework that costs both time and money. Your kitchen remodel checklist comes down to this final step where every prior decision gets executed in the field.
Follow the correct construction sequence
Every kitchen remodel follows the same proven order, and deviating from it creates problems that compound quickly. Demolition always comes first, clearing out cabinets, flooring, and fixtures before any new work begins. From there, rough-in work for electrical and plumbing happens inside open walls before drywall closes everything up.

Never close walls before a licensed inspector signs off on rough electrical and plumbing, since failed inspections force you to tear into finished surfaces.
Follow this build sequence on every project:
- Demolition and debris removal
- Rough electrical and plumbing
- Rough-in inspection
- Insulation and drywall
- Flooring installation
- Cabinet installation
- Countertop templating, fabrication, and installation
- Backsplash tile installation
- Appliance installation
- Finish electrical and plumbing (outlets, fixtures, faucets)
- Painting touch-ups
- Final inspection
Complete a punch list before final payment
A punch list is a written record of every item that needs correction or completion before you release the final payment to your contractor. Walk through the finished kitchen with your contractor and document anything that doesn’t meet the agreed scope, including scratched surfaces, missing hardware, grout gaps, or improperly sealed areas.
Use this template to record each issue:
| Item | Location | Description | Contractor Responsible | Resolved |
|---|---|---|---|---|
Hold your final payment until every punch list item is signed off. This is your strongest leverage point to ensure the work meets the standard you agreed to at the start of the project.
Wrap it up and start your remodel
You now have a complete kitchen remodel checklist that covers every stage from defining your goals through your final punch list walkthrough. Each step builds on the one before it, so working through them in sequence keeps your budget intact, your timeline realistic, and your contractors aligned. Skipping or reordering any phase is where most Tampa homeowners run into problems that cost real money to fix.
Starting a kitchen renovation feels overwhelming until you break it down into specific decisions with a clear order. Pull out your project folder, complete Step 1 today, and move forward one phase at a time. Every item on this checklist is a decision made before it becomes an expensive problem on the job site.
Ready to get your project moving with a team that knows Tampa kitchens? Contact Fenelon Handyman Services to walk through your scope and get an honest, itemized quote.