
A small kitchen doesn’t mean you’re stuck with a cramped, frustrating workspace. The right kitchen layout ideas for small kitchens can completely change how your room functions, giving you more counter space, smarter storage, and a flow that actually makes cooking enjoyable. Whether you’re working with a galley, an L-shape, or a tight square footage you didn’t choose, there’s a configuration that fits.
The trick is matching your layout to how you actually use your kitchen, not just how it looks on Pinterest. A family of four that cooks every night has different needs than someone who mostly reheats and entertains. That’s something we see firsthand at Fenelon Handyman Services. After more than a decade of remodeling kitchens across the Tampa area, we’ve learned that the best layouts come from understanding the homeowner’s habits, then building around them. We’ve also seen how Tampa’s humidity and older home construction can limit or expand your options in ways that generic advice doesn’t cover.
This guide breaks down 14 practical kitchen layouts that work in small spaces, organized so you can find ideas no matter your budget. You’ll get real floor plan strategies, storage solutions, and design tips you can act on, whether you’re planning a full remodel or just rethinking what you already have. Each layout includes what it’s best suited for, so you can skip straight to the ones that match your situation.
1. Start with a measured layout plan and code check
Before you look at any specific kitchen layout ideas for small kitchens, you need a precise, accurate map of your existing space. Skipping this step leads to cabinets that don’t fit, appliances in the wrong spots, or a layout that looks good on paper but fails in real life. Grab a tape measure and map every wall, window, door swing, and utility line before you pick a single design direction.
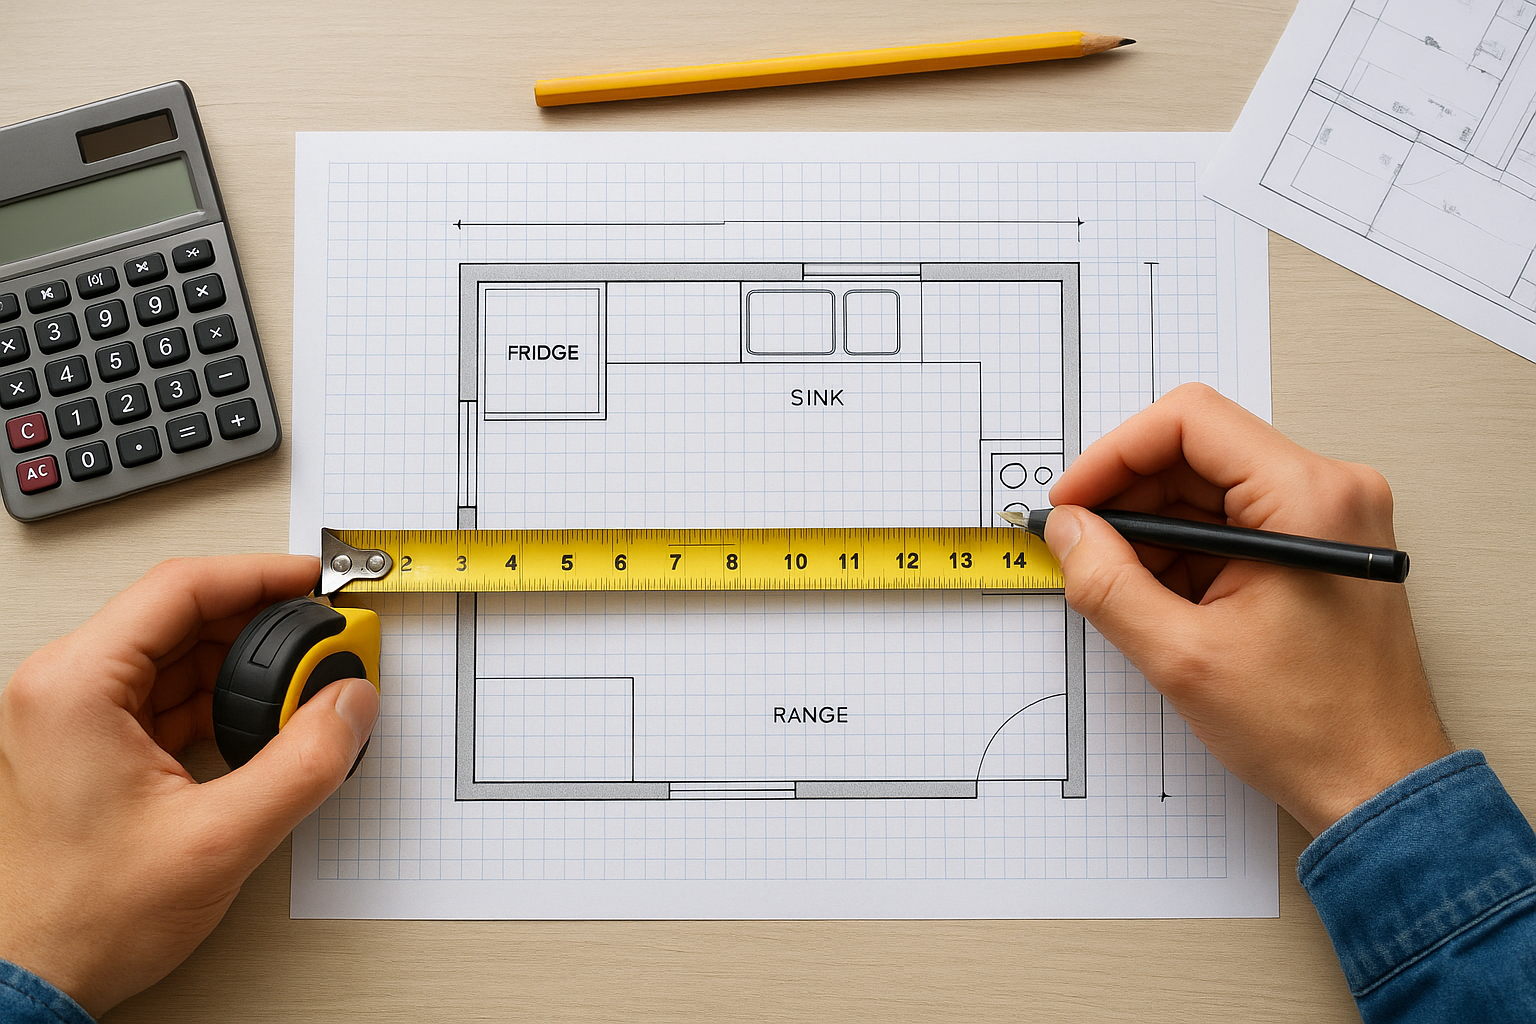
Layout snapshot
A measured layout plan is a bird’s-eye view drawing of your kitchen at a fixed scale, typically 1/4 inch equals 1 foot. You mark the locations of existing plumbing supply and drain lines, electrical outlets, the range hood or vent, and any load-bearing walls. In older Tampa homes, you’ll often find galley-style footprints built around mid-century construction standards, which means tight widths and utility connections that aren’t always where you’d want them.
Key clearances to plan for
Clearances are the measurements that keep your kitchen safe and code-compliant, and they apply whether you’re working with 60 square feet or 120. These numbers come from building codes and appliance manufacturer requirements, so treat them as fixed constraints before you finalize anything else.
Moving a sink or gas line is possible, but it adds significant cost fast, so your layout plan helps you decide early whether to work with existing utility locations or budget for the move.
Here are the core clearances to record on your plan:
- Work corridor width: 42 inches minimum for one cook, 48 inches for two
- Refrigerator swing clearance: 36 inches in front of the door
- Dishwasher door clearance: 21 inches open, with no cabinets directly across
- Range to overhead cabinet: 30 inches vertical clearance to any combustible surface
Budget-friendly ways to pull it off
You don’t need to hire a designer to produce a workable layout plan. Free tools like graph paper or Google Slides let you draw scaled floor plans at no cost, and Google’s SketchUp Free offers a basic 2D mode for anyone who prefers a digital option.
The most important investment here is your time spent measuring accurately rather than money on software. A handyman or remodeling contractor can review your draft plan, flag code conflicts, and confirm whether your utility locations support the layout you want before you commit to anything.
2. One-wall kitchen with a tall pantry zone
A one-wall layout places all your cabinets, appliances, and counters along a single wall, making it one of the most space-efficient kitchen layout ideas for small kitchens. This configuration works best in narrow rooms, studio apartments, and open-plan spaces where you need the kitchen to stay compact without blocking traffic flow.
Layout snapshot
In a one-wall kitchen, your sink, range, and refrigerator line up in a straight row. The key upgrade that makes this layout genuinely functional is adding a full-height pantry cabinet at one or both ends of the run. That tall cabinet handles dry storage, small appliances, and even cleaning supplies, so your counter and base cabinets stay clear for active prep work.
A pantry tower at 84 to 96 inches tall can store as much as four standard base cabinets combined, making it a high-return addition in tight spaces.
Key clearances to plan for
You need at least 48 inches of open floor space directly in front of the entire cabinet run so you can open appliance doors and move comfortably. Keep the refrigerator at the end of the run rather than the middle to prevent it from splitting your workflow and blocking access to neighboring cabinets when the door swings open.
Budget-friendly ways to pull it off
Stock pantry cabinets from home improvement stores cost significantly less than custom built-ins. You can also repurpose a freestanding pantry unit if your budget is limited, anchoring it securely to the wall stud. Painting the pantry the same color as your surrounding cabinets keeps the look cohesive without spending extra on custom finishes.
3. Galley kitchen with a true work corridor
A galley layout runs two parallel walls of cabinets and appliances facing each other with a single corridor between them. This is one of the most efficient kitchen layout ideas for small kitchens because it keeps your sink, stove, and prep area within a few steps of each other, cutting out the wasted movement that makes tight spaces feel even more frustrating during meal prep.
Layout snapshot
In a galley kitchen, one wall typically holds the sink and dishwasher while the opposite wall holds the range and main prep counter. The refrigerator goes at one end of the corridor so it stays accessible without interrupting your workflow mid-cook. Keeping the work triangle tight means you can move from prep to cook to clean in a straight line without crossing your own path.
A galley layout works best in rooms that are at least 8 feet long and no wider than 12 feet, since anything wider starts to stretch your work triangle and defeats the layout’s main advantage.
Key clearances to plan for
You need a minimum of 42 inches between the two facing cabinet runs for a single cook, and 48 inches if two people share the kitchen regularly. Keep both ends of the corridor open rather than capped with walls or cabinets so traffic can pass through without interrupting whoever is cooking at the range or sink.
Budget-friendly ways to pull it off
Reusing existing cabinet boxes by simply replacing the doors and hardware cuts remodeling costs significantly in a galley layout. Adding under-cabinet lighting on both walls improves visibility for prep work and costs far less than reconfiguring your plumbing or electrical footprint entirely.
4. L-shaped kitchen that keeps the center open
An L-shaped kitchen arranges cabinets and appliances along two adjacent walls, forming a right angle in one corner of the room. This is one of the most versatile kitchen layout ideas for small kitchens because it leaves the center of the room completely open, giving you room to move freely and keeping the space from feeling enclosed.
Layout snapshot
Your sink typically anchors the corner or one leg of the L, with the range and refrigerator positioned along the two arms so your work triangle stays compact. The open floor space in the center gives you flexibility to pull in a small table, a rolling cart, or simply keep the room easy to navigate. This layout suits square or slightly rectangular rooms better than long narrow ones, where the L-shape can’t form a functional angle.
Placing the sink at the inner corner of the L maximizes counter run on both sides, giving you prep space to the left and right without burning any linear footage.
Key clearances to plan for
You need at least 42 inches of open floor space on both working sides of the L so appliance doors clear properly and two people can pass without blocking each other. Keep the corner cabinet accessible by installing a lazy Susan, pull-out shelves, or a diagonal cabinet door rather than letting that valuable storage go unused.
Budget-friendly ways to pull it off
Stock corner cabinet inserts cost far less than custom solutions and still recover most of the dead corner storage. Painting the walls a light color keeps the two-wall configuration from feeling boxy without requiring any structural changes to your existing footprint.
5. L-shaped kitchen with a slim peninsula
Adding a slim peninsula to an L-shaped layout gives you extra counter space and a casual seating option without closing off the room the way a full island would. This is one of the most practical kitchen layout ideas for small kitchens that open onto a living or dining area, because the peninsula acts as a natural divider while keeping sight lines open across the space.
Layout snapshot
The peninsula extends from one arm of the L, typically the longer run, perpendicular into the room. You gain a second prep surface on the kitchen side and seating for two to three people on the outer edge with bar stools. Positioning the peninsula parallel to your main work counter keeps the work triangle intact while adding functional square footage without requiring any additional wall space.
A peninsula overhang of 12 inches supports standard bar stools; bump it to 15 inches if you want comfortable knee clearance for seated guests.
Key clearances to plan for
Clearances make or break this layout, so lock these numbers in before you finalize anything:
- Work aisle between the peninsula and the opposing wall: 42 inches minimum, 48 inches if two people cook regularly
- Outer walkway around the open end: 36 inches minimum
- Peninsula overhang for seating: 12 to 15 inches
Budget-friendly ways to pull it off
Building a peninsula from stock base cabinets topped with a butcher block counter costs far less than custom cabinetry. Finishing the outer face with paint-grade panels and trim keeps the look polished without a high price tag.
Using open shelving on the outer peninsula face instead of closed cabinet doors saves additional money and creates a practical display area for dishes or frequently used cookbooks.
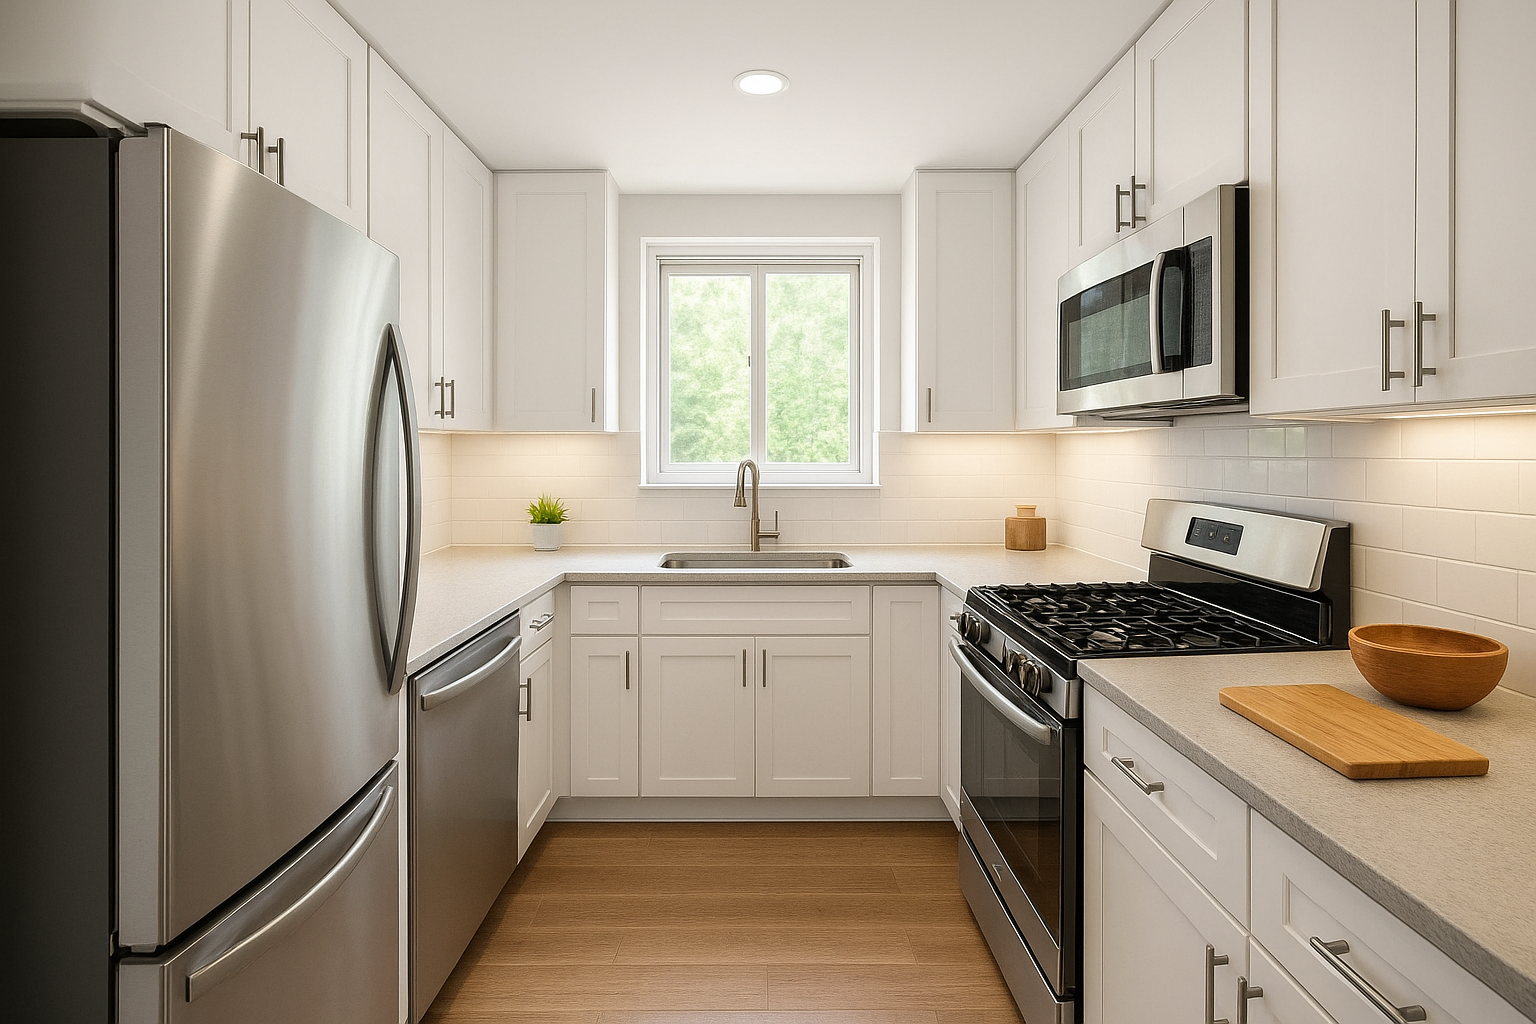
6. U-shaped kitchen for maximum counter space
A U-shaped layout wraps cabinets and counters along three connected walls, giving you more continuous counter space than almost any other small kitchen configuration. If you cook regularly and need room for prep, plating, and cleanup at the same time, this is one of the most productive kitchen layout ideas for small kitchens with the right room dimensions.
Layout snapshot
Three walls of storage mean your sink, range, and refrigerator each get their own dedicated run with counter space on at least one side. Place the sink along the back wall centered between the two arms, put the range on one side, and anchor the refrigerator at the open end of one arm so it stays accessible when unloading groceries without interrupting your active work zone.
A U-shaped kitchen needs at least 8 feet of interior width between the two parallel walls, otherwise the corridor feels too narrow to work in comfortably.
Key clearances to plan for
Your layout needs specific clearances to stay functional and code-compliant. Here are the numbers to lock in before finalizing your plan:
- Minimum interior corridor width: 60 inches between the two parallel cabinet runs
- Entry opening: 36 inches minimum so traffic can move through without blocking the cook
- Corner cabinet reach depth: 24 inches maximum for base cabinets to stay reachable
Budget-friendly ways to pull it off
Stock cabinets in a consistent finish across all three walls unify the U-shape without custom pricing.
Installing lazy Susans or pull-out drawers in both corner sections using standard hardware store kits recovers valuable storage at a fraction of what custom built-ins cost.
7. U-shaped kitchen with a pass-through opening
A U-shaped kitchen with a pass-through opening solves the biggest complaint about the standard U-shape: it can feel closed off and isolated from the rest of your home. Cutting an opening into one of the three walls keeps the storage and counter advantages of the U while connecting your kitchen to the adjacent living or dining space.
Layout snapshot
You remove a section of the wall on one arm of the U, typically the wall facing your dining or living area, and replace it with a counter-height shelf. That shelf serves as a serving surface, a casual breakfast bar, or simply a visual connection between rooms. This is one of the kitchen layout ideas for small kitchens that genuinely makes a tight space feel larger without any structural overhaul to the floor plan itself.
A pass-through opening of at least 36 inches wide gives you a functional serving ledge while keeping enough wall on either side to support upper cabinets.
Key clearances to plan for
The pass-through shelf height should sit between 36 and 42 inches so it works comfortably as both a counter extension and a bar surface. Keep the corridor between the two parallel cabinet runs at 60 inches minimum so the open wall doesn’t compromise your workspace.
Budget-friendly ways to pull it off
Framing and finishing a pass-through opening is a moderate carpentry project that costs far less than adding a peninsula or island. Topping the opening with butcher block or a laminate shelf keeps the finishing cost low while still giving you a durable, attractive ledge.
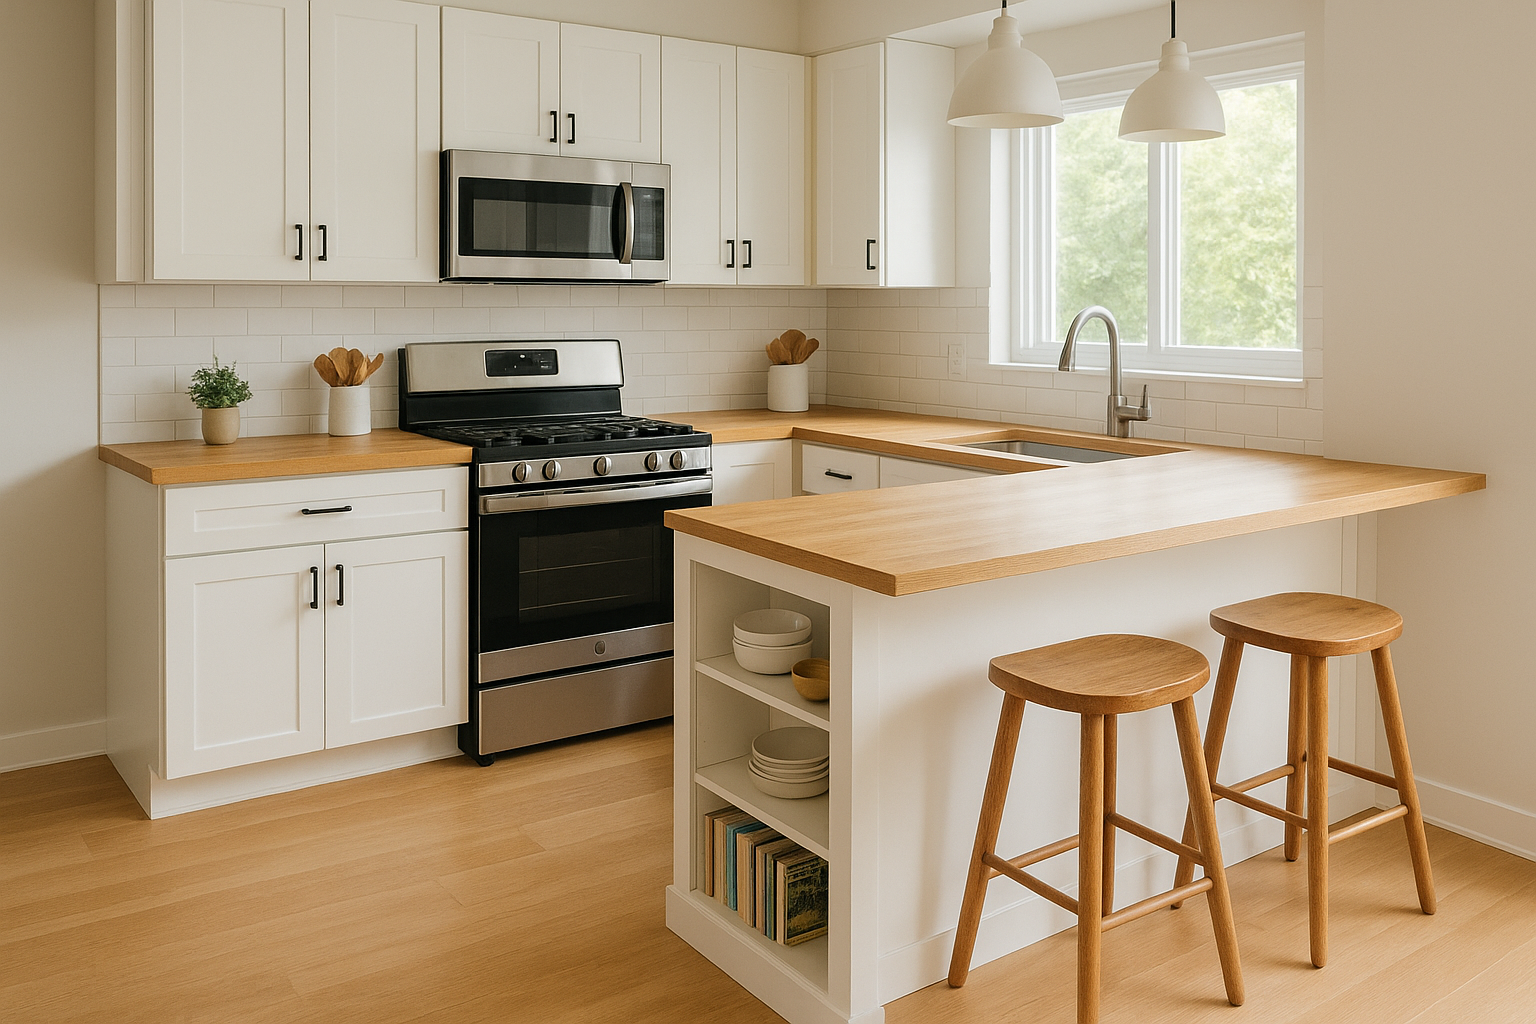
8. Peninsula-first layout for small open plans
A peninsula-first layout flips the typical design approach by treating the peninsula as the starting point, then building the kitchen cabinets and appliances around it. This works exceptionally well in small open-plan homes and condos where the kitchen flows directly into a living or dining area without a dedicated wall to anchor a traditional layout. It’s one of the more creative kitchen layout ideas for small kitchens that benefit from borrowed square footage in an adjacent room.
Layout snapshot
The peninsula sits perpendicular to one wall, creating a natural boundary between your kitchen zone and the open living space. Your cabinets and appliances line the back wall and one side wall, with the peninsula completing the third side of a loose U-shape. This arrangement gives you a defined cooking area and a casual seating surface on the room-facing side without closing off the space entirely.
A peninsula-first layout works best when your kitchen wall run is at least 10 feet long, giving you enough cabinet storage to balance the peninsula’s footprint.
Key clearances to plan for
You need 42 inches minimum between the peninsula and any opposing cabinet run so appliance doors clear properly and you can move freely while cooking. Keep at least 36 inches of open floor space around the open end of the peninsula so foot traffic can circulate without cutting through your active work zone.
Budget-friendly ways to pull it off
Building the peninsula from stock base cabinets finished with paint-grade panels keeps costs manageable. Adding a butcher block top gives you a durable prep surface and a seating overhang at a lower price point than stone or quartz.
9. One-wall plus a rolling cart island
A one-wall layout paired with a rolling cart island gives you the flexibility of a movable prep surface without permanently committing floor space to a fixed structure. This is one of the most adaptable kitchen layout ideas for small kitchens because you can push the cart out of the way when you need the room and roll it in when you’re actively cooking.
Layout snapshot
Your cabinets, appliances, and sink line a single wall as usual, but a rolling cart sits in the open floor space during prep and cleanup. The cart functions as a secondary work surface, additional storage, or even a serving station depending on your needs. When you’re not cooking, it rolls to a corner or out of the kitchen entirely, keeping traffic flow clean.
A cart with locking wheels and a butcher block top gives you the most practical dual-use surface without the cost or permanence of a built-in island.
Key clearances to plan for
You need at least 42 inches of open floor space between the cart and the main cabinet wall so you can open appliance and cabinet doors without obstruction. The cart itself should be no wider than 24 inches to keep it maneuverable in tight quarters and easy to reposition without rearranging the room.
Budget-friendly ways to pull it off
Standard rolling kitchen carts with butcher block or stainless tops are widely available at home improvement stores and cost a fraction of a built-in island. Look for models with lower shelf storage and side hooks to maximize what the cart contributes beyond just a counter surface.
10. Kitchen with a built-in banquette nook
A built-in banquette replaces a freestanding dining table and chairs with a fixed bench seat tucked into a corner or against a wall. This swap frees up significant floor area in the kitchen itself, making it one of the most space-efficient kitchen layout ideas for small kitchens where eating and cooking share the same footprint.
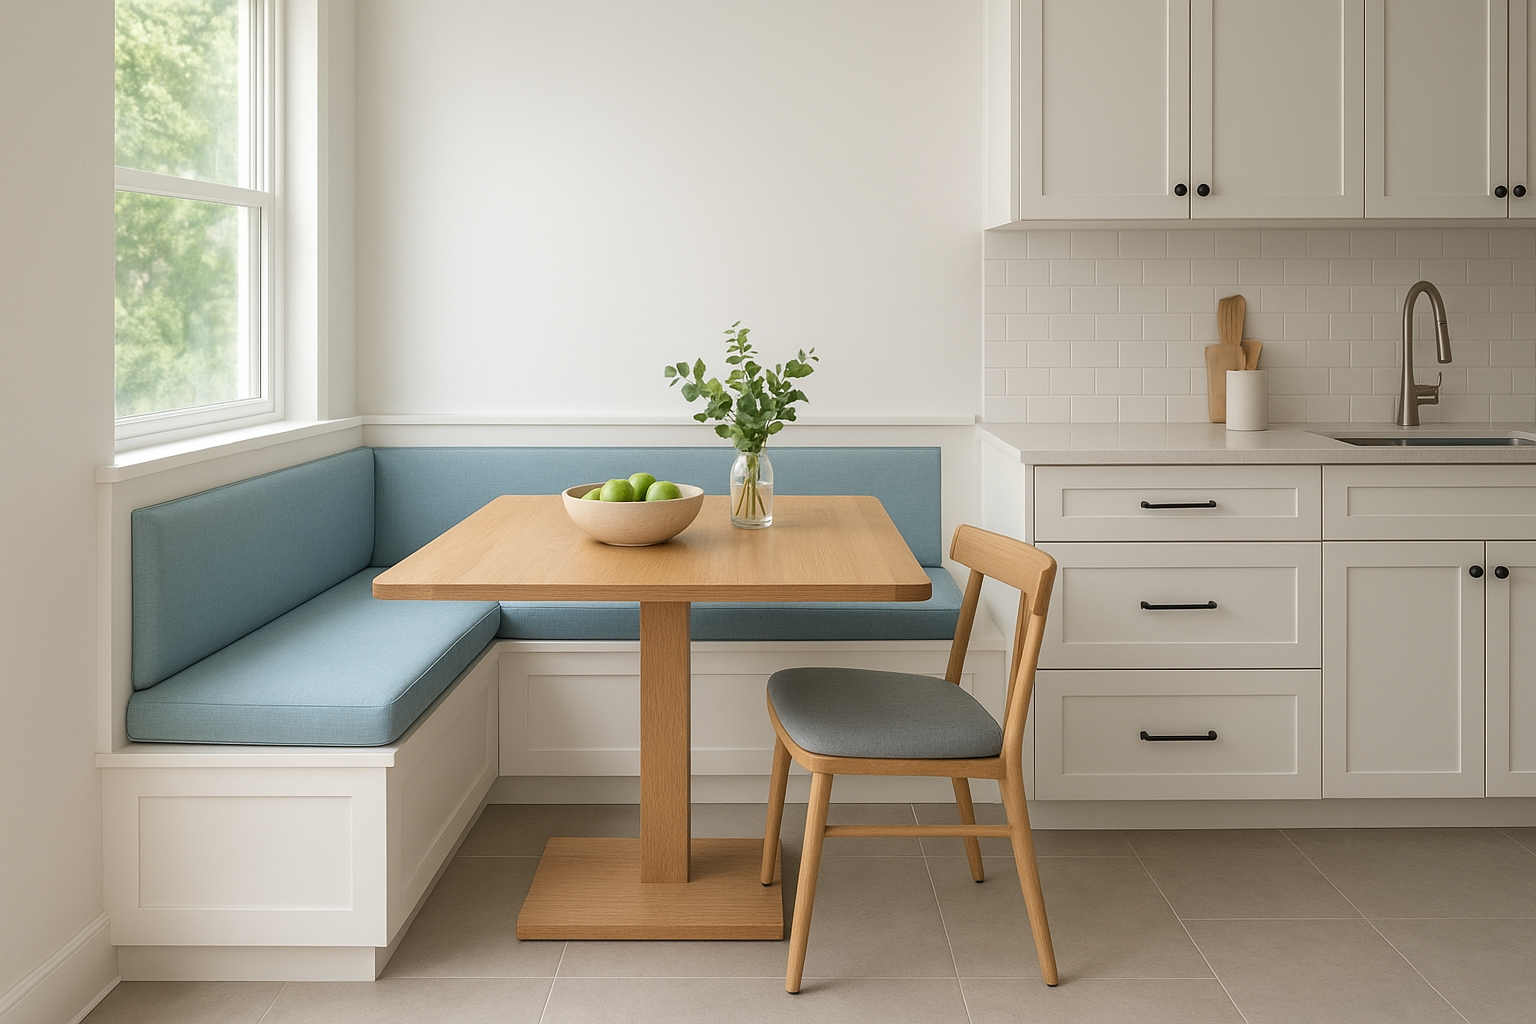
Layout snapshot
The banquette typically occupies a corner of the room adjacent to the kitchen work zone, leaving your main cabinet runs and appliances uninterrupted. You gain a dining area without pushing furniture into the middle of the floor, and the bench seats provide hidden storage underneath through lift-top lids or drawers built into the base. This works particularly well in Tampa homes with combined kitchen and dining rooms, where the two functions need to coexist without each one crowding the other.
A banquette with under-seat storage can hold as much as two standard base cabinets, giving you a serious return on the square footage it occupies.
Key clearances to plan for
You need 36 inches of clearance between the table edge and any opposing wall or cabinet so seated guests can slide in and out comfortably. Keep the table depth at 30 to 36 inches to maintain comfortable reach across the surface without making the nook feel cramped on both sides.
Budget-friendly ways to pull it off
Building a basic banquette frame from plywood and paint-grade lumber keeps material costs low, and adding a simple foam cushion with outdoor fabric handles Tampa’s humidity far better than upholstery. Pairing the bench with a wall-mounted folding table reduces the footprint even further when the nook is not in use.
11. Corner-sink layout that frees up prep space
Moving the sink from a standard flat wall run into the corner of your kitchen completely changes how much usable counter space you have to work with. This is one of the more overlooked kitchen layout ideas for small kitchens, but it frees up long, uninterrupted stretches of counter on both sides of the corner that would otherwise be interrupted by the sink basin and its surrounding fixtures.
Layout snapshot
In a corner-sink layout, the sink sits at the perpendicular junction of two cabinet runs, typically within an L-shaped or U-shaped kitchen configuration. This positions your drain connection at the corner, which is often close to existing plumbing lines in older Tampa homes with original galley or L-shaped footprints.
You gain a clear prep surface on both arms extending from the corner, which is especially useful when you need cutting board space and bowl staging room at the same time without one task crowding out the other.
Placing the sink in the corner also puts a window directly above it in many floor plans, giving you natural light over your prep work without any structural renovation required.
Key clearances to plan for
You need at least 36 inches of counter run on each side of the corner sink so both prep zones stay functional rather than decorative. Keep the drain line connection within 5 feet of the stack if possible, since longer runs require steeper pipe slopes that reduce the usable depth of your base cabinets below.
Budget-friendly ways to pull it off
A standard undermount corner sink costs less than a custom basin and fits into most corner cabinet cutouts with minimal modification to your existing countertop. Installing stock corner base cabinets with a lazy Susan below keeps the plumbing accessible for maintenance while recovering storage that a dead corner would otherwise waste.
12. Appliance-wall layout with a tighter work zone
An appliance-wall layout consolidates your refrigerator, microwave, and small appliances onto a single dedicated wall, separating them from your active cooking and prep zone. This separation is one of the more underused kitchen layout ideas for small kitchens because it keeps counters clear for actual work while reducing the foot traffic that turns a small kitchen into a collision course during busy meal prep.
Layout snapshot
Your main work zone holds the sink, range, and primary prep counter along one wall or run, while the appliance wall handles cold storage, reheating, and small appliance tasks on a separate surface. This division means you can have someone pull items from the refrigerator or use the microwave without stepping into your active cooking space. The appliance wall works best along a shorter wall or an entry-adjacent wall where it stays accessible without interrupting the primary cooking flow.
Stacking a microwave above a counter-height refrigerator on the appliance wall frees up an entire base cabinet run for storage you would otherwise lose to bulky appliances.
Key clearances to plan for
You need 36 inches of open floor space in front of the appliance wall so refrigerator and microwave doors swing fully open without obstruction. Keep the appliance wall counter depth at 24 inches to match standard base cabinet dimensions and maintain a consistent visual line across the room.
Budget-friendly ways to pull it off
Using stock base cabinets with open upper shelves on the appliance wall costs significantly less than built-in appliance towers. Adding a power strip mounted inside an upper cabinet keeps small appliance cords hidden and outlets accessible without rewiring your kitchen.
13. Kitchen layout with a dedicated coffee and snack zone
Carving out a dedicated zone for your coffee maker, electric kettle, and everyday snacks removes those tasks from your primary work triangle entirely. This separation is one of the more practical kitchen layout ideas for small kitchens where multiple people need to access the kitchen at different times without getting in each other’s way.
Layout snapshot
Your coffee and snack zone occupies a short section of counter, typically 24 to 36 inches wide, positioned away from the sink and range on a side wall or at the end of a cabinet run. The area holds your coffee maker, a small shelf for mugs, and a drawer for grab-and-go snacks. Keeping this zone self-contained with its own outlet and dedicated storage means someone can make coffee in the morning without crowding whoever is cooking at the range.
A dedicated snack zone also reduces how often your main pantry gets opened during non-meal times, which keeps that storage organized longer.
Key clearances to plan for
Your coffee zone needs at least 24 inches of counter space so appliances sit fully on the surface without overhanging the edge. Keep 18 inches of vertical clearance between the countertop and any upper cabinet above to accommodate a standard drip coffee maker or espresso machine without forcing you to tilt the carafe at an awkward angle.
Budget-friendly ways to pull it off
A single stock base cabinet with an open upper shelf mounted on a short wall section handles this zone without custom cabinetry costs. Adding a dedicated outlet on that wall during any electrical work you already have planned keeps the upgrade cost minimal.
Floating shelves above the counter replace upper cabinets at a lower price point and keep mugs and supplies visible and accessible without opening any doors.
14. Hidden kitchenette layout for studios and lofts
A hidden kitchenette layout conceals your entire kitchen behind cabinet doors or a curtain panel when you’re not using it, turning your cooking zone into a clean, seamless wall. This ranks among the most space-conscious kitchen layout ideas for small kitchens in studios, lofts, and converted garage spaces where the kitchen needs to share visual real estate with your living area.
Layout snapshot
Your appliances, sink, and storage sit along a single shallow wall run, typically 6 to 8 feet wide, enclosed within a built-in cabinet surround with full-height doors that close flush across the entire front face. A compact refrigerator fits beneath the counter, a two-burner induction cooktop drops into the surface, and a small single-basin sink handles washing tasks without requiring a deep base cabinet footprint. When the doors close, the kitchen disappears entirely into the surrounding wall.
A hidden kitchenette works best on a wall that sits adjacent to your bathroom plumbing stack, since keeping supply and drain lines short reduces both installation cost and pipe complexity.
Key clearances to plan for
You need at least 36 inches of open floor space in front of the kitchenette so cabinet doors swing fully clear without hitting furniture. Keep the counter depth at 21 inches rather than the standard 24 inches to reduce the kitchenette’s footprint in a tight room without losing meaningful prep space.
Budget-friendly ways to pull it off
Stock flat-front cabinets in a consistent single color create the seamless wall effect without custom cabinetry pricing. Choosing an induction cooktop over a gas range eliminates the need for a gas line connection, which cuts both installation cost and ventilation requirements significantly.

Next steps for your small kitchen
These 14 kitchen layout ideas for small kitchens cover the most practical configurations available, but the right one for you depends entirely on your specific room dimensions, utility locations, and how you actually cook day to day. Start by measuring your space accurately and identifying which layouts fit your existing footprint before committing to any changes.
From there, prioritize the upgrades that give you the most return. Counter space and storage access matter more than aesthetics, so focus on function first and finish choices second. Small changes like repositioning an appliance, adding a rolling cart, or opening up a pass-through can transform how your kitchen feels without a full remodel.
When you’re ready to move from planning to building, Fenelon Handyman Services provides licensed, professional kitchen remodeling across the Tampa area. The team can help you turn your layout ideas into a finished kitchen that works for your home and budget.