
Did you know that a single faucet dripping just once per second can waste more than 3,000 gallons of water in a year? According to the EPA, that is enough water to take 180 showers. It is hard to ignore that rhythmic plink-plink-plink when you are trying to sleep at 2:00 AM, especially when you know every drop makes a leaky faucet repair more urgent for your monthly budget. We understand how frustrating it is to feel stuck between an annoying noise and the confusion of ball valves versus ceramic cartridges.
This guide gives you the tools to reclaim your peace and quiet. You’ll learn how to troubleshoot common issues, handle basic fixes yourself, and recognize when Florida’s high mineral content has caused enough damage to require a professional hand. We are breaking down the steps to get your sink back to normal, helping you decide if this is a quick DIY project or a time to call your local handyman. By the end of this article, you will have a clear plan to stop the drip and lower your utility costs for good.
Key Takeaways
- Stop wasting thousands of gallons of water and lower your Tampa utility bills by addressing drips before they become costly headaches.
- Learn how to identify your specific fixture type—from compression to ceramic disk—so you can find the right parts without a second trip to the hardware store.
- Master the basics of leaky faucet repair with a straightforward guide to shutting off your water and disassembling the handle safely.
- Discover the common mistakes that lead to cracked valves and know exactly when it’s time to call in your local expert to prevent permanent damage.
- Find out when repairing an old fixture isn’t worth the cost and how modern upgrades like touchless faucets can improve your home’s hygiene.
Why Leaky Faucet Repair in Tampa is a 2026 Priority
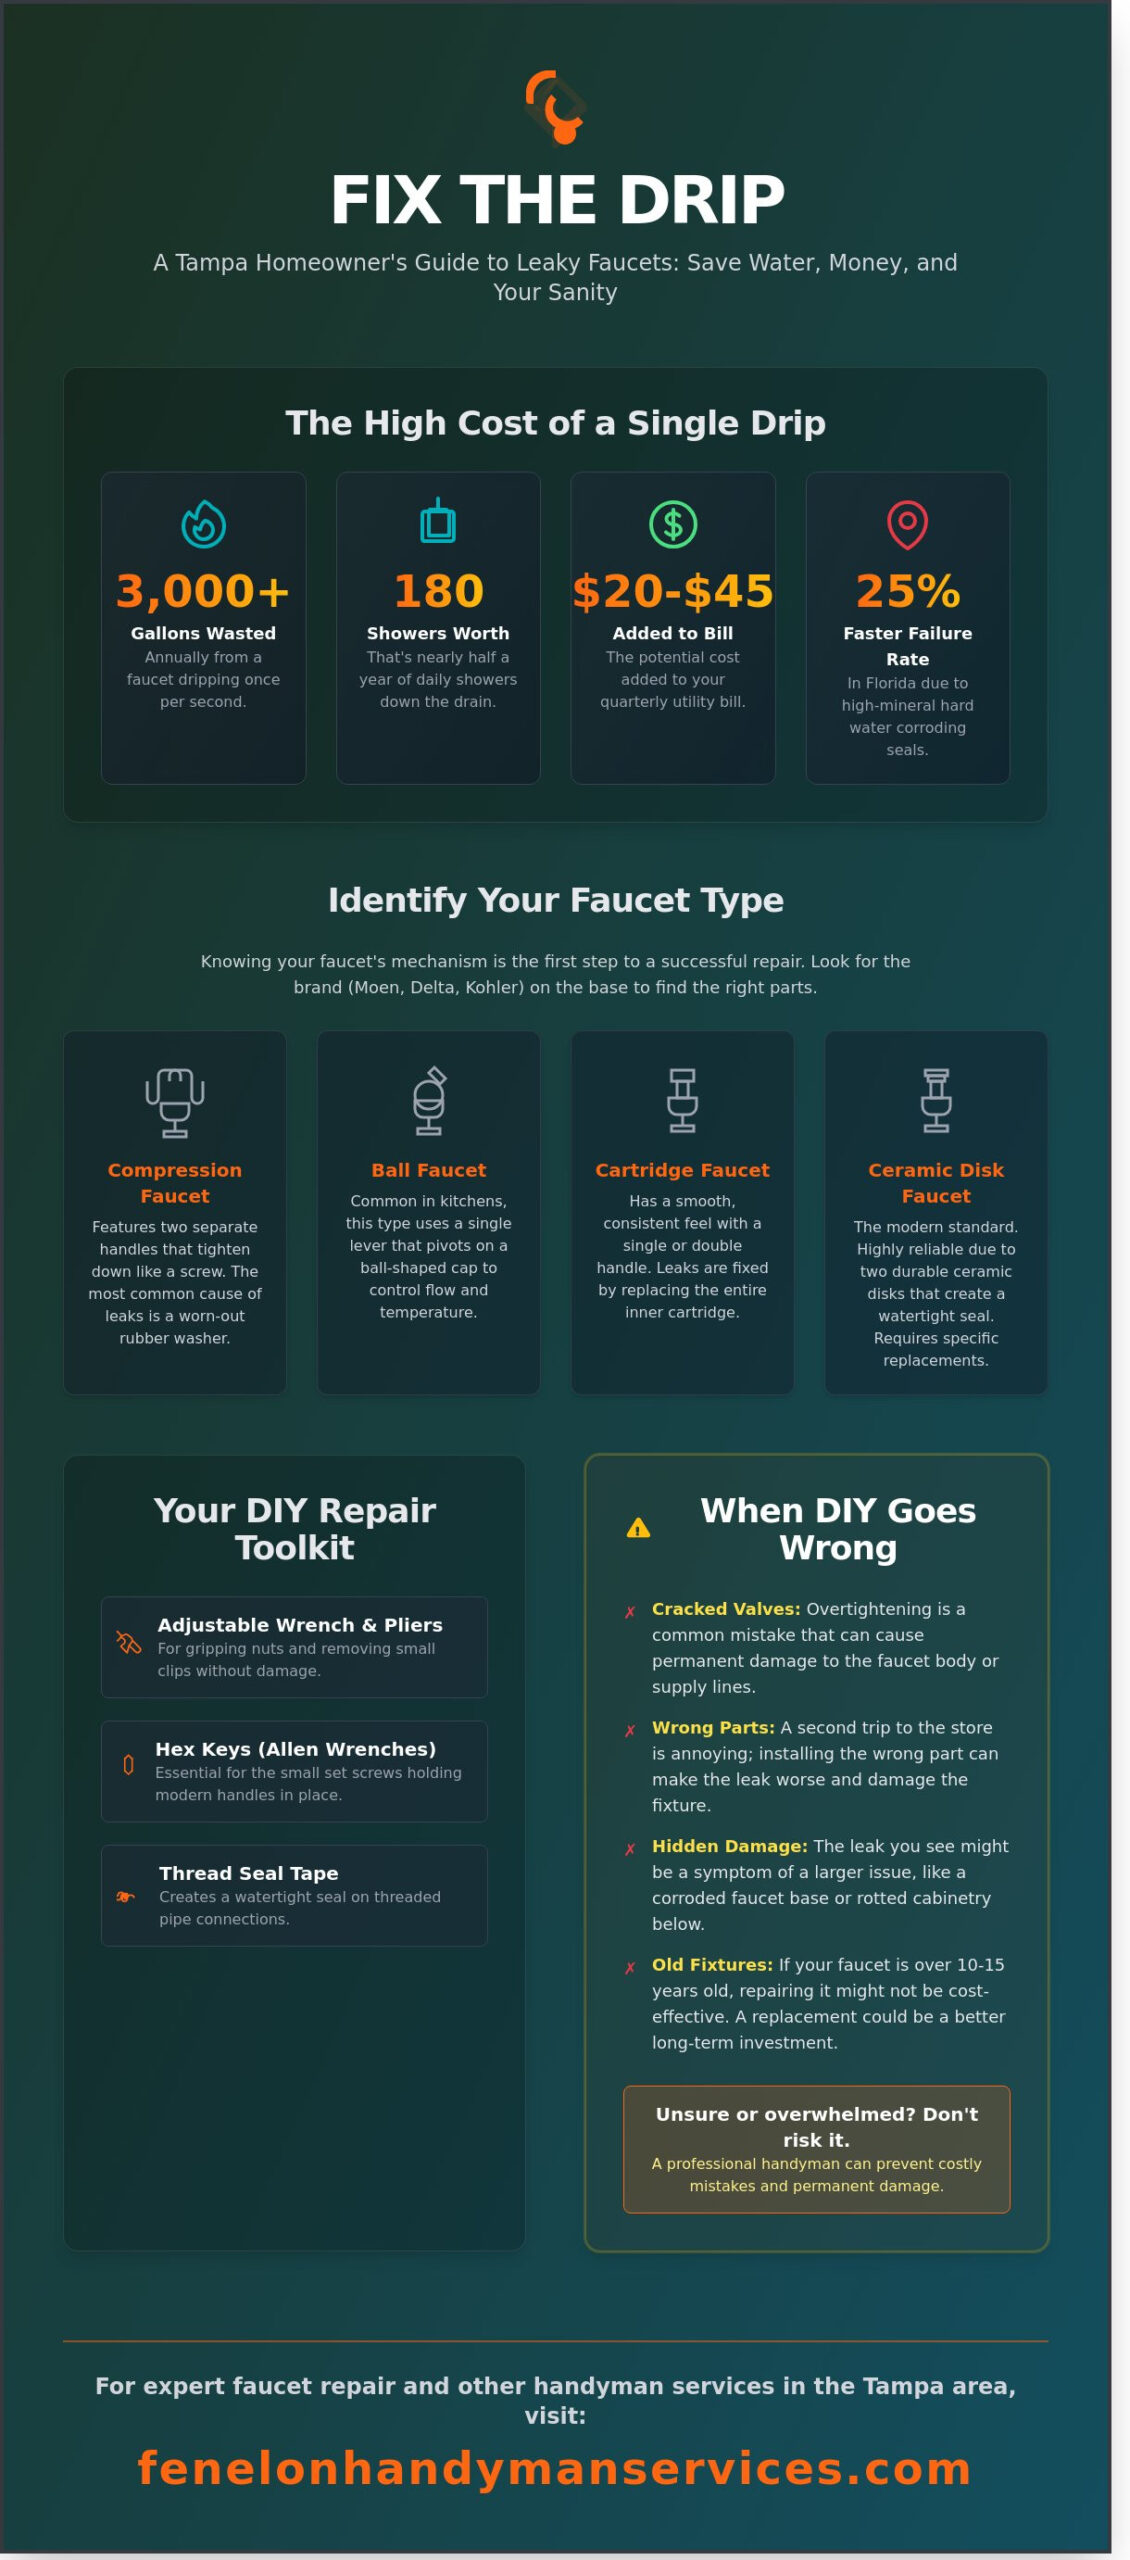
That steady “drip, drip, drip” in your kitchen or bathroom is more than just a background noise that keeps you up at night. It’s a signal that your home is losing resources and money. In 2026, staying on top of leaky faucet repair has become a necessity for Tampa homeowners. A single faucet leaking at a rate of one drip per second wastes over 3,000 gallons of water every year. That is enough water to take more than 180 showers. When you multiply that across a household with multiple aging fixtures, the waste becomes staggering.
Tampa Bay water rates have seen steady adjustments to keep up with our growing population. In Hillsborough County, utility bills reflect the high cost of treating and moving water through our infrastructure. Every gallon wasted by a worn-out washer or a corroded valve adds up on your monthly statement. Beyond the financial cost, we have a local responsibility to protect the Floridan Aquifer. This vital underground source provides nearly 90% of our region’s drinking water. Simple home maintenance is the easiest way to ensure our local environment stays healthy for the next generation.
To better understand the mechanics of these repairs, watch this helpful video:
The Hidden Costs of a Dripping Faucet
Calculating the “drip-to-dollar” ratio for Hillsborough County residents reveals that a moderate leak can add $20 to $45 to your quarterly bill. However, the water bill isn’t the only expense. Tampa’s average humidity often hovers around 74%, creating a perfect environment for mold. A small leak under a sink can lead to wood rot in your cabinetry in less than 60 days. It’s much cheaper to fix a seal today than it is to hire home repair services in St. Petersburg to replace a moldy vanity and subfloor later.
Florida Hard Water vs. Your Fixtures
Our local water is notorious for its high mineral content. Calcium and magnesium deposits, commonly known as limescale, act like sandpaper on the internal components of your plumbing. These minerals eat away at rubber washers and cartridge seals, causing them to fail prematurely. While understanding faucet types is helpful, most Tampa homeowners will notice white, crusty buildup around the aerator or handle first. This mineral corrosion is the primary reason fixtures in Florida fail 25% faster than those in regions with softer water. If you see that white buildup, your internal seals are likely already struggling.
Identifying Your Faucet Type Before You Start
Before you grab your toolbox, you need to know exactly what kind of hardware you’re dealing with. Identifying the brand, such as Moen, Delta, or Kohler, is the first step to a successful leaky faucet repair. You can usually find the brand name etched on the base of the spout or on the handle itself. Knowing the manufacturer saves you from making multiple trips to the hardware store because most internal parts aren’t interchangeable. It’s better to spend five minutes identifying the model now than an hour standing in the plumbing aisle later.
The Four Main Faucet Mechanisms
Compression faucets are the traditional choice. They feature two separate handles for hot and cold water. You’ll know it’s a compression model if the handle feels like it’s tightening down a screw to stop the flow. These rely on rubber washers that wear out over time. Ball faucets are common in Tampa kitchens. They use a single lever that moves over a ball-shaped cap to control temperature and pressure. Cartridge and ceramic disk faucets are the modern standard. They offer a smooth, consistent feel and are highly reliable, though they require specific cartridge replacements when they finally fail. Understanding these mechanisms is vital because a single leaking tap can waste more than 3,000 gallons of water annually. This is a big reason why fixing leaks is important for both your monthly utility bill and the local Florida environment.
Tools You Will Need for the Job
A simple screwdriver isn’t enough for most modern Florida fixtures. You’ll need a specific set of tools to handle the job without damaging the finish of your sink. Gather these items before you turn off the water supply:
- Adjustable wrench and needle-nose pliers: These are essential for gripping nuts and removing small clips.
- Hex keys (Allen wrenches): Many single-handle faucets use a tiny set screw to hold the handle in place.
- Basin wrench: This specialized tool allows you to reach the mounting nuts tucked high behind the sink basin.
- Thread seal tape: Often called Teflon tape, this ensures your connections stay watertight.
- Plumbers grease: A small amount of silicone-based grease helps new O-rings and cartridges slide into place easily.
If you don’t have these tools on hand or find the mechanical details a bit confusing, don’t worry. You can always reach out to your local handyman to get your leaky faucet repair handled quickly and professionally. Having a pro take a look ensures the job is done right the first time, giving you back your weekend and your peace of mind.
Step-by-Step: How to Fix a Leaky Faucet Yourself
A dripping tap is more than just an annoying sound at night. According to the U.S. Environmental Protection Agency guide to fixing leaks, a single leaky faucet dripping at one drip per second can waste more than 3,000 gallons of water per year. Taking the time for a leaky faucet repair saves you money and protects your home from moisture damage. Most homeowners can handle this task with basic tools and a bit of patience.
Start by shutting off the water supply. You will usually find two silver valves under the sink. Turn them clockwise until they stop. If the valve is stuck due to mineral buildup, do not force it with your bare hands. Spray a small amount of penetrating oil on the valve stem and let it sit for 15 minutes. Use a wrench to gently nudge it loose. Once the water is off, turn the faucet on to drain any remaining liquid from the pipes.
Next, disassemble the handle. Use a flathead screwdriver to pop off the decorative cap, then unscrew the handle screw. Lift the handle off to reveal the internal stem or cartridge. Use an adjustable wrench to loosen the packing nut or pull the cartridge straight up. Inspect these parts for cracked O-rings, flattened washers, or pitted metal. Tampa’s hard water often leaves white calcium scales on these components. Use a soft cloth or an old toothbrush dipped in white vinegar to clean the internal housing. Removing this grit ensures the new seals sit flush against the metal.
Preparing Your Workspace
Before you start, put a towel or a rag in the sink drain. This “towel in the drain” trick is the best way to prevent tiny set screws from disappearing into the plumbing forever. As you take the faucet apart, lay each piece on a paper towel in a straight line. Organize them in the exact order they were removed. This makes reassembly much easier for a beginner. While you are working under the cabinet, take a moment to look for other leaks, such as water in the bottom of your dishwasher, which can indicate a shared drainage issue.
Replacing the Internal Components
Do not try to eyeball the size of your replacement parts. Take your old cartridge or washer to a local Tampa hardware store to ensure a 100 percent match. Even a fraction of a millimeter difference can cause the drip to return. Before you slide the new parts in, apply a thin coating of non-toxic plumbers grease to the new O-rings. This prevents the rubber from cracking and stops minerals from sticking to the seals in the future. Reassemble the faucet in reverse order. Use the “slow-bleed” method when turning the water back on. Open the faucet handle halfway, then slowly turn the under-sink valves. This prevents a sudden burst of air pressure from blowing out your new seals. Your leaky faucet repair is now complete, giving you back your peace of mind.
When DIY Goes Wrong: Troubleshooting and Professional Help
Sometimes you follow every step, yet that steady “drip-drip-drip” continues to echo through your kitchen. It’s frustrating. If your leaky faucet repair didn’t hold, the problem might be hidden within the metal itself. A common culprit in older Tampa homes is a pitted valve seat. Over 8 to 12 years, minerals in the local water supply can eat away at the brass, creating tiny canyons that prevent a washer from making a perfect seal. If the seat is rough to the touch, replacing the rubber won’t solve the issue.
You also need to watch your strength. Many homeowners think a tighter turn stops a leak, but over-tightening is a recipe for disaster. If you have a modern faucet with a ceramic disc valve, excessive force can crack the porcelain. Once that happens, the entire cartridge is ruined. You’ll move from a simple fix to an expensive hardware replacement in seconds. If the handle feels stiff or won’t stop the water with a normal turn, it is time to step back and call in a professional.
Common DIY Pitfalls in Florida Homes
Living near the Gulf means dealing with salt-air corrosion. Screws often seize up, making it nearly impossible to disassemble the fixture without stripping the head. If you force a stuck screw, you risk ruining the finish or breaking the stem. Another common mistake is using a “close enough” washer. A difference of just 1/32nd of an inch can cause the seal to fail under pressure, often resulting in a midnight flood that ruins your under-sink cabinetry.
- Seized Components: Use penetrating oil and wait 20 minutes before trying to turn old screws.
- Wrong Parts: Always take the old part to the hardware store to ensure an exact match.
- Finish Damage: Wrap your pliers in a rag to avoid scratching the chrome or brushed nickel.
The Professional Handyman Checklist
There are moments when the job scales beyond a quick fix. If the shut-off valve under the sink starts leaking while you are working, you need an expert immediately. This often happens in homes built before 2005 where the valves haven’t been turned in years. We also see many cases where a slow leak has already caused hidden damage. You might need drywall repair in Tampa if water has wicked into the walls behind the vanity.
Your local handyman is here to provide peace of mind. We believe no job is too small, whether it’s a single leaky faucet repair or a full fixture upgrade. We show up on time, bring the right tools, and make sure the work is done correctly the first time. You don’t have to spend your weekend fighting with a stubborn sink. Let us handle the heavy lifting so you can get back to your life.
Ready to stop the drip for good? Contact Fenelon Handyman Services today for reliable, local help you can trust.
Beyond the Repair: Upgrading Your Tampa Kitchen or Bath
Sometimes a standard leaky faucet repair acts as a temporary fix for a fixture that’s simply past its prime. If you find yourself calling for help with the same drip every six months, it’s time to look at the bigger picture. Tampa’s local water supply contains minerals that eventually wear down even the best brass fittings. Upgrading your hardware doesn’t just stop the noise; it transforms the efficiency of your daily routine.
Modern touchless faucets are a game changer for hygiene and conservation. These sensors prevent the spread of bacteria and can reduce your annual water usage by 15% or more. Choosing a high-efficiency model helps you save money on utility bills while meeting the 2026 standards for sustainable home design. It’s a practical way to bring your home into the future while solving a recurring headache.
Repair vs. Replacement: The 50% Rule
We tell our neighbors to follow the 50% rule. If the cost of your leaky faucet repair exceeds 50% of the price of a brand-new unit, replacement is the smarter financial move. Most kitchen faucets have a reliable lifespan of roughly 15 years. If your fixture was installed before 2011, the internal valves are likely too degraded for a simple washer swap to hold up long-term. Your local handyman can help you evaluate if the metal is pitting or if a simple fix will suffice.
- Warranty Protection: Professional installation ensures your manufacturer’s warranty remains intact, covering you for future defects.
- Resale Value: Updated fixtures offer a 3% to 5% boost in perceived home value during a Tampa Bay real estate appraisal.
- Reliability: New units feature ceramic disc valves that are nearly immune to the leaks that plagued older rubber-seal models.
Integrating Repairs into a Larger Remodel
A small leak is frequently the first sign that your space needs a fresh start. Many homeowners find that a single new fixture makes the rest of the room look dated. This realization often serves as the perfect jumping-off point for a comprehensive bathroom remodeling in Clearwater. We help you select hardware that handles Florida’s unique environment and high humidity levels.
Matching your new fixture to local durability standards is essential. Brushed nickel and stainless steel are excellent choices because they hide the white mineral spots common in Pinellas County water. If you’re looking to refresh your cooking space, a faucet upgrade can lead naturally into a kitchen remodeling in Clearwater. Your local handyman is here to ensure your home stays leak-free, functional, and beautiful throughout 2026 and beyond. We take pride in doing the job right the first time so you can enjoy your home without the stress of a constant drip.
Restore Your Peace of Mind and Save Water Today
Fixing a drip isn’t just about stopping an annoying noise; it’s about protecting your home’s value and lowering utility bills as we head into 2026. Whether you’ve successfully identified your specific faucet type or realized that a full fixture upgrade is the better path for your Tampa kitchen, taking action now prevents expensive water damage. A professional leaky faucet repair can save local homeowners hundreds of gallons of water every year. Since 2021, Fenelon Handyman Services has provided expert plumbing repairs and fixture installations across Tampa, Clearwater, and St. Pete. We take pride in delivering quality workmanship with a neighborly touch because we know your home is your sanctuary. If the DIY steps felt overwhelming or you’d simply rather spend your Saturday afternoon enjoying the Gulf breeze, we’re ready to step in. You don’t have to struggle with stubborn bolts when your local handyman is ready to do the heavy lifting for you.
Let Your Local Tampa Handyman Handle the Drip, Request an Estimate Today!
We look forward to helping you get your home back in perfect working order soon.
Frequently Asked Questions
Why is my faucet still dripping after I replaced the washer?
A leaky faucet repair often fails when the valve seat is corroded or pitted. When the metal seat isn’t smooth, a new rubber washer can’t form a watertight seal. In 85% of cases involving older compression faucets, you’ll need to resurface the seat with a dressing tool or replace it entirely to stop the drip for good. This simple step ensures your work lasts for years.
How much does it typically cost for a professional to fix a leaky faucet in Tampa?
A professional leaky faucet repair in Tampa typically costs between $125 and $350 depending on the specific parts needed. This price usually includes a standard service call fee and roughly 1 hour of labor. If the internal valve body is cracked, 90% of professionals will recommend a full replacement, which can range from $400 to $600 including the cost of the new fixture.
Can I use WD-40 to loosen a stuck faucet handle?
You can use WD-40, but a dedicated penetrating oil like PB Blaster is 50% more effective at breaking through stubborn calcium deposits. Spray the lubricant directly onto the handle screw and let it sit for 15 minutes before you attempt to turn it. This prevents you from stripping the screw or snapping the delicate brass stem inside the handle, which would require a much bigger fix.
How do I know if I have a cartridge or a ball faucet?
You have a ball faucet if there’s a single lever that moves over a rounded, dome-shaped cap. These are common in 70% of older Delta and Peerless kitchen sinks. If the handle pulls up or turns 90 degrees with a smooth, consistent feel, it’s likely a cartridge faucet. This is the standard for 80% of modern Moen and Kohler models found in Florida homes.
Is a leaky faucet considered an emergency repair?
Most leaks aren’t emergencies unless the water is spraying or cannot be shut off at the local valve. However, a faucet dripping at a rate of 60 drops per minute wastes 2,082 gallons of water per year. This adds roughly $25 to your monthly Tampa utility bill. Addressing a leaky faucet repair quickly protects your home and keeps your water costs under control while providing peace of mind.
What is the best way to remove hard water stains from my faucet?
Soak a rag in a 50/50 solution of white vinegar and water, then wrap it around the stained area for 30 minutes. The acetic acid breaks down the calcium carbonate found in Tampa’s hard water, which often measures over 200 parts per million. Wipe the surface with a soft microfiber cloth to prevent scratching the finish. This method is safe for 95% of metal faucet surfaces.
Should I replace both the hot and cold side parts at the same time?
You should replace both sides because they’ve likely experienced the same amount of wear and tear over time. If the cold side fails today, there’s a 90% chance the hot side will start leaking within 3 to 6 months. Spending an extra $15 on a second cartridge now saves you from paying for another service call later. It’s a smart way to get the job done right the first time.
How do I find the model number of my faucet for replacement parts?
Look for a small metal tag on the supply lines under the sink or a laser-etched logo on the base of the spout. If the faucet was installed after 2015, the model number is often printed on a white tag attached to the PEX tubing. You can also text a clear photo of the fixture to your local handyman to help identify the 4-digit or 5-digit part code.