Rotted door frame repair in Tampa, shown on one real job: what rot at the bottom of a jamb looks like, repair vs. replace, the epoxy fix step by step, and costs.
Rotted door frame repair in Tampa is, most of the time, a repair — not a new door. If the rot is confined to the bottom foot or so of the jamb and casing and the wood above is still hard, the soft material gets cut back, rebuilt with two-part epoxy, sanded to profile, primed, and painted, and the bill lands in the low hundreds. This is that job, start to finish, on one real Tampa entry door.
The house is typical of the bay: an exterior entry door with a white wood jamb and casing, a brick-paver walkway outside, carpet inside, and a bottom corner that had been quietly drinking rain and sprinkler spray for years. It is the classic setup: paint peeling at the floor and wood under it that feels wrong. Every photo below is from this one door, in order.
What the Homeowner Saw (and What a Screwdriver Found)
Rot at the bottom of a door frame never announces itself. The first sign is cosmetic: paint that bubbles or lifts along the bottom few inches of the jamb and casing. Press it and the paint skin flexes like a blister. Press with a flathead screwdriver and the tip disappears into wood that should have stopped it. This door had all three: lifted paint, a soft corner, and a screwdriver that sank in with no effort.
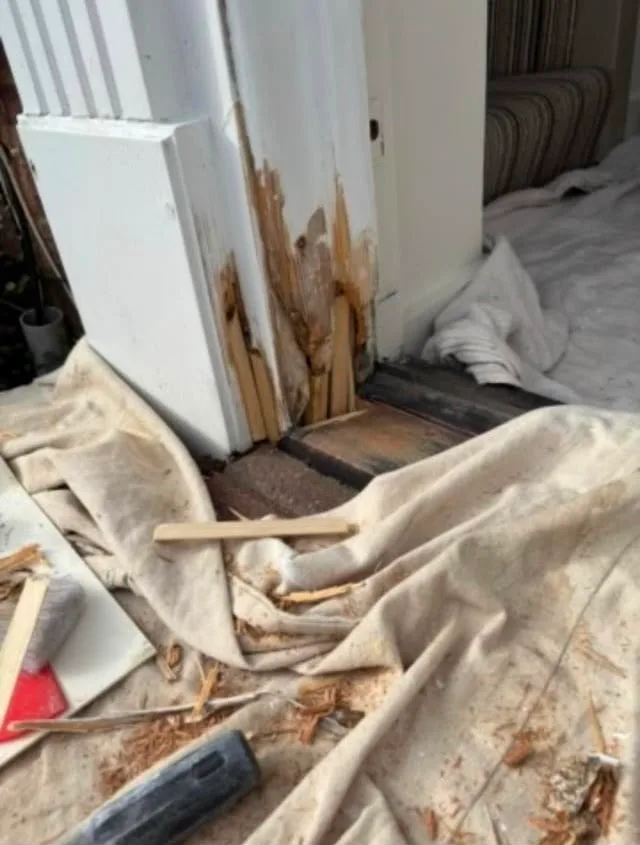
Under the paint: ordinary Florida rot. Soft, rotted wood running up from the threshold and stopping where the wood turned dry and hard again. Rot travels with the water — it starts where the frame meets the sill, wicks up the end grain, and stalls where the wood can dry between storms. Above the bottom foot or so, this jamb rang solid. That one fact decided the whole job.
Rot or Termites? A Quick Note
The two get confused constantly in Florida, and the fixes are different. Rot is fungal: soft, damp, crumbly, darkened, stringy — exactly what this jamb showed. Termite damage follows the grain in clean, hollowed galleries, often with mud tubes or pellet piles nearby, and needs an inspection before anyone reaches for filler. Nothing here pointed to insects, but we always look first.
Every cause, every repair tier, and Tampa cost ranges for rot on jambs, sills, and fascia — plus the full rot-versus-termite comparison: Wood rot repair in Tampa
Repair the Frame or Replace It? The Screwdriver Rule
The decision is not taste; it is a probe. Work a flathead screwdriver up the jamb from the threshold and up the casing beside it, pressing every few inches. Where it sinks, mark it; where it stops, that is sound wood. If the soft zone stays in the bottom foot or so, the frame above is hard, and the threshold is the only other casualty, you have an epoxy repair. Replacement is unavoidable when:
- The wood is soft well past the bottom foot, or the hinge jamb no longer holds screws.
- The jamb is separating from the wall, or the frame is so far out of square that the door binds along a whole edge.
- The rot has crossed into the head jamb, the subfloor at the sill, or the framing behind the frame.
This one was textbook repairable, and that matters for the wallet: a jamb-bottom epoxy repair costs a fraction of a new pre-hung exterior door. In Florida a new exterior door is a different animal — the unit generally needs a Florida product approval, and the swap generally triggers a permit and wind-load rules. That is licensed-contractor territory; verify with your local building department. Repairing the jamb and casing of an existing door is squarely handyman scope.
Jamb, casing, brickmould, sill, threshold — which piece is which, and why the name on the estimate changes the price: Door jamb vs. door frame
How We Repaired This Rotted Door Frame, Step by Step
- Peel back the paint. All the lifted skin comes off so we can see how far the damage runs — paint hides rot; it does not stop it.
- Probe and cut back to sound wood. Chisel, oscillating saw, and a stiff wire brush take out everything soft, then a little more, until the screwdriver bites hard on every surface — casing included, not just the jamb.
- Dry it. Rot fungus needs moisture; epoxy needs a dry substrate. On a Tampa afternoon that means fans and patience, or a dry-morning return. Filling wet wood locks the water in with the fungus.
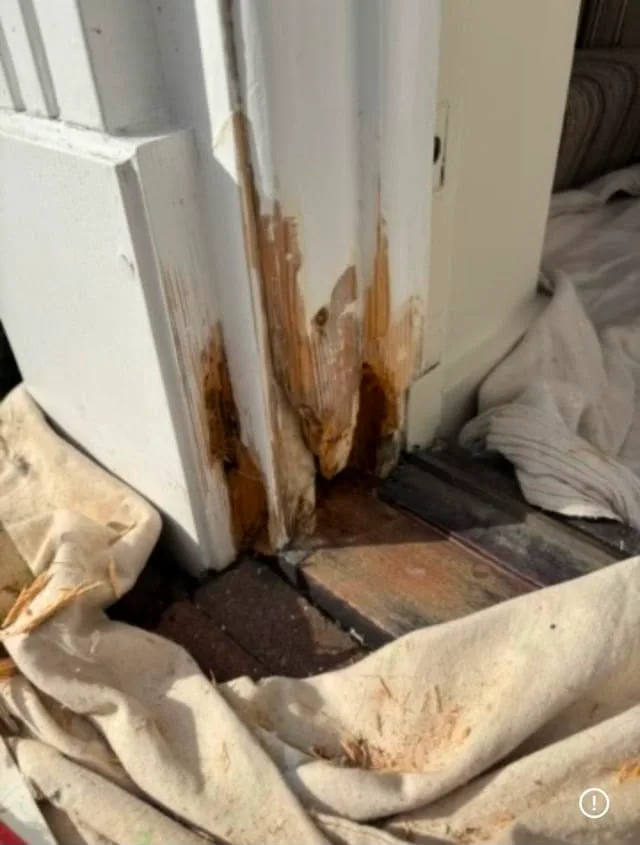
- Consolidate. A liquid two-part epoxy consolidant soaks into the exposed grain and hardens the border between what we removed and what we kept, so the filler bonds to solid material.
- Fill and sculpt. Two-part structural epoxy filler, packed into the cavity and roughed to the shape of the jamb and casing while it is still workable. Overbuild slightly; sanding beats a second fill.
- Cure. In our humidity the cure times on the can are optimistic. We wait until it is hard, not until the clock says so.
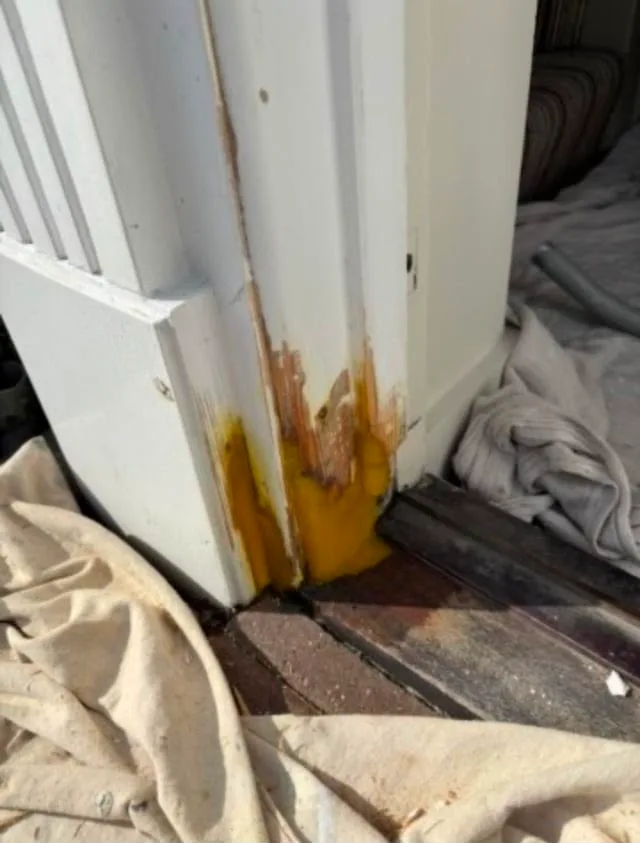
Why Epoxy Beats a Wood Patch Here
A wood splice — the classic dutchman — is the right call when the bottom of a jamb is simply gone. For rot that stops in the bottom foot with a ragged boundary, epoxy wins on three counts: it bonds to sound wood on every surface instead of one glued seam, it has no end grain to wick water the way fresh pine on a threshold will, and it takes the casing profile without a router or a hunt for matching stock. It is not stronger than a whole new jamb; it is more durable than a small piece of new wood in the wettest spot on the house.
- Sand to profile. Blocks and a detail sander take the epoxy flush and follow the casing profile until you cannot feel a transition with your eyes closed.
- Prime with a stain-blocking exterior primer, wrapping the cut end at the sill — that is where the water starts.
- Repaint. Two finish coats of exterior paint over the whole lower section, feathered up so there is no line.
- Set and seal the new threshold. The old dark threshold came out with the rot; a new dark-bronze aluminum threshold went in level, bedded in sealant, ends sealed to the jambs so water sheds onto the pavers, not behind the frame.
- Caulk every joint that was open when we arrived — casing to the wall, jamb to threshold.
- Check the swing and the weatherstrip. Latch caught, sweep meeting the new threshold, weatherstrip touching all the way around. Daylight at the bottom corner is how the next repair starts.
The prep-and-paint half of this job on its own — what primer, what sheen, and how to keep a Tampa entry door from peeling again: How to paint a front door in Tampa
The After
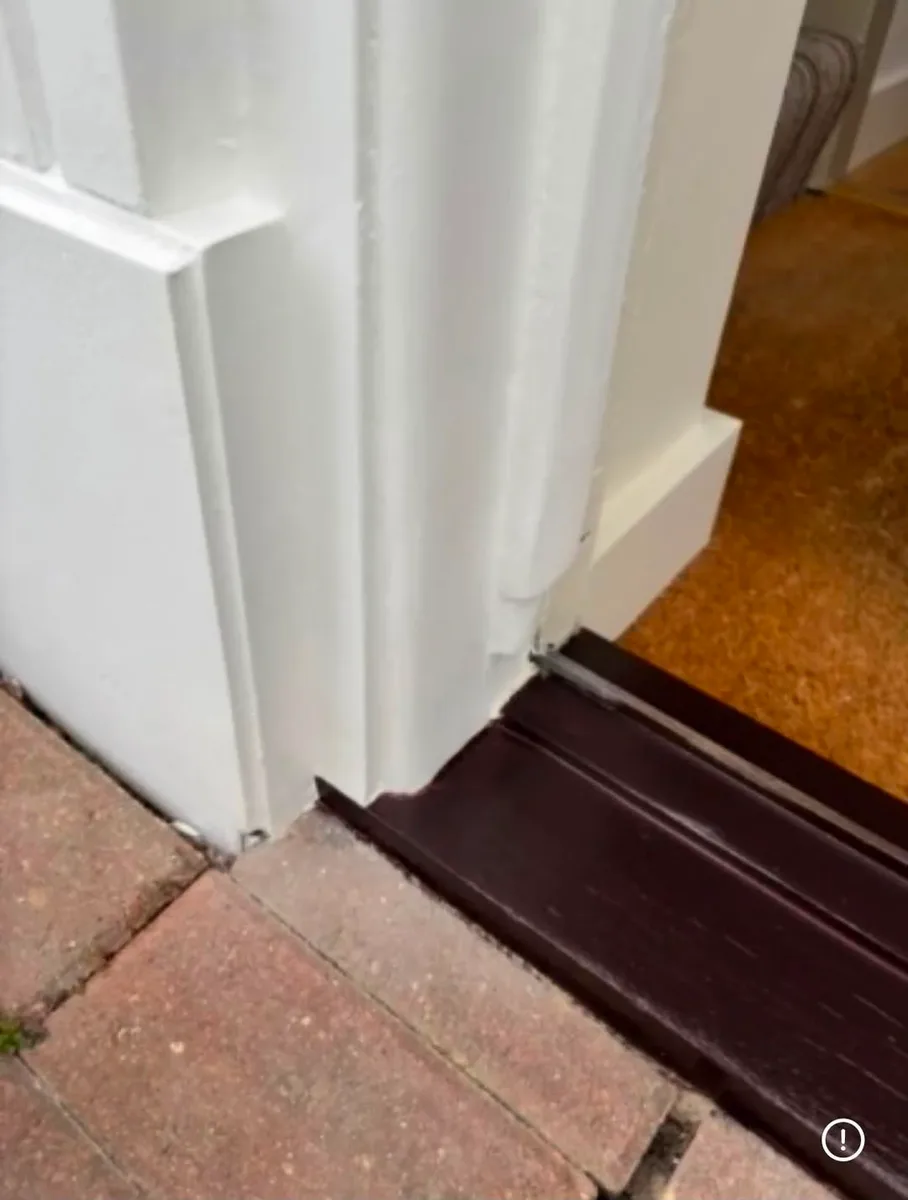
This is the standard for a jamb rot repair: no bump, no seam, no shadow line where epoxy meets wood. The casing profile runs straight down onto the new threshold, and the water that started all this now lands on aluminum and pavers instead of end grain.
What Rotted Door Frame Repair Costs in Tampa (and How Long It Takes)
We do not publish one client's invoice, but honest 2026 Tampa Bay ranges look like this:
- Jamb-bottom epoxy repair — cut back, consolidate, fill, sand, prime, and paint one door: low hundreds, roughly $150–$450. A new threshold, set and sealed, pushes toward the top of that range or a little past it.
- Full jamb leg replacement — one side of the frame cut out, a new jamb (PVC or treated wood in the splash zone) fitted, door rehung, trimmed, painted: more, typically several hundred to around a thousand.
- Whole pre-hung exterior door replacement — new unit, frame and all: four figures, and in Florida generally permit, wind-load, and product-approval territory. Licensed contractor; verify what your city or county requires.
Time: a repair like this one is a single working day for the cut-back, epoxy, threshold, and primer, with finish paint often on a short return once everything has cured — Tampa humidity stretches every cure time on the can. The door closes and locks the same night.
Where the line sits between handyman repair and licensed-contractor replacement in Tampa — doors included, with costs: Handyman vs. contractor in Tampa
Why Tampa Door Frames Rot at the Bottom
The bottom of an exterior door frame is the wettest square foot of wood on a Tampa house. Afternoon storms come in sideways and drive rain straight at the sill, so any door without a deep overhang takes it on the threshold joint most days from June to September. Sprinklers do the rest — a head aimed at the walkway hits the same corner of the jamb twice a day, and it is the single most common cause of the localized rot we cut out. Humidity keeps the wood from ever fully drying. And the housing stock cooperates: the block ranches and bungalows built across Hillsborough from the 1950s through the 70s often still carry their original wood jambs and casing under decades of repaints.
It also gets found. Home inspectors probe door frames as a matter of routine, and a rotted jamb bottom is one of the most common lines on a Tampa inspection report — the kind that turns into a repair credit at closing. A few hundred dollars of epoxy in April beats a negotiation in September.
We see this pattern all over the bay: on Seminole Heights bungalow side doors, on Carrollwood ranch entries where a sprinkler head has been hitting the jamb for years, on original jambs in Temple Terrace block homes near our shop, on Brandon front doors with no overhang to speak of, and on South Tampa homes where the paver walkway pitches toward the house. The diagnosis is usually the same: sound frame, soft bottom, water source still running.
Rot at the door frame is one of the first things a buyer's inspector writes up — here is what else to fix before you list: Home repairs before selling in Tampa
How to Keep the Rot From Coming Back
- Re-aim or cap the sprinkler head that hits the door. If the frame gets wet on a dry day, this is why, and no repair outlasts it.
- Keep the sill caulked. Jamb-to-threshold and brickmould-to-wall are the whole defense; recaulk when it cracks, not when it fails.
- Repaint on schedule. Exterior paint on a Tampa door frame is a wear item — touch up the bottom the moment it lifts.
- Sweep the threshold. Leaves, mulch, and sand against the sill hold water against the wood.
- Fix the drip above the door. An overflowing gutter or a bare eave dumps water on the same corner every storm.
- Probe once a year. Screwdriver, thirty seconds, every exterior door — spring, before the rains.
When to Call a Pro
- The screwdriver sinks in anywhere on the frame — the sooner it is cut back, the smaller the bill.
- The door has started to sag, drag, or miss the strike; frame and alignment work together, and rot is usually the reason.
- You can see daylight at the bottom corner or the weatherstrip has pulled away — water is already getting past.
- The rot keeps returning in the same spot after a patch; something upstream is still feeding it.
- The frame itself is failing — soft above knee height, pulling from the wall, or into the framing — and you need a straight answer on repair versus licensed replacement.
Frequently asked questions
- Can a rotted door frame be repaired instead of replaced?
- Yes, in most cases we see. If the rot is confined to the bottom foot or so of the jamb and casing and the wood above is sound, the soft material is cut back, consolidated, rebuilt with two-part epoxy, sanded to profile, primed, and painted. Replacement is for frames that are soft well up the jamb, separating from the wall, or rotted into the framing.
- How much does rotted door frame repair cost in Tampa?
- A jamb-bottom epoxy repair on one exterior door typically runs in the low hundreds — roughly $150 to $450, a bit more with a new threshold. A full jamb leg replacement costs more, usually several hundred to around a thousand. A whole new pre-hung exterior door is four figures and, in Florida, generally permit and licensed-contractor territory.
- How do I know if my door frame is rotted?
- Look at the bottom few inches of the jamb and casing for lifted or cracked paint, dark staining, or a gap opening at the threshold. Then press a flathead screwdriver into the wood: sound wood stops it; rotted wood lets it sink. Probe up the jamb every few inches to find where the soft zone ends — that is the size of the repair.
- Is epoxy strong enough to fix a door frame?
- For contained rot at the bottom of a jamb, yes. Two-part structural epoxy bonds to sound wood on every surface, cures harder than the pine it replaces, has no end grain to wick water, and holds paint for years. It is not a substitute for a jamb that can no longer hold hinge screws — that gets a new jamb leg.
- Do I need a permit to fix a rotted door frame in Florida?
- Repairing the jamb, casing, and threshold of an existing exterior door is maintenance work and generally handyman scope. Replacing the whole door unit is different: a new exterior door in Florida generally has to meet wind-load and product-approval rules and typically triggers a permit, so it goes to a licensed contractor. Rules vary by city and county — verify locally.
Sticking, sagging, drafty, or soft at the bottom — the door repair service behind this frame: Door repair in Tampa
Paint lifting at the bottom of your door frame? Fenelon Handyman Services cuts out the rot, rebuilds the jamb and casing so you cannot find the repair, and reseals the threshold and casing so the water stays out — across Tampa Bay, with free written quotes. Call (786) 509-5555 for a free quote. Get a free door frame repair quote.
Door Repair in Tampa, FL
Done-for-you by an insured local crew — free quotes, same-week scheduling.
Need a hand with this in Tampa?
Get a free quote from a 4.8★ local crew. We answer fast and show up on time.
We handle this kind of work across Tampa Bay — including handyman service in University, handyman service in Carrollwood, handyman service in Brandon and handyman service in Lutz. See all service areas.