
IKEA kitchen cabinets are one of the most popular choices for homeowners looking to remodel on a budget, and for good reason. They’re affordable, modular, and surprisingly customizable. But here’s the catch: IKEA kitchen cabinets installation is a hands-on process that demands patience, precision, and a solid understanding of how these flat-pack systems actually go together. Skip a step or misread a measurement, and you could end up with crooked cabinets, poor alignment, or worse, damage to your walls.
Whether you’re planning to tackle this project yourself or you’d rather hand it off to a professional, this guide walks you through the full process. We’ll cover the tools you need, how to prep your space, step-by-step installation instructions, and tips we’ve picked up from years of doing exactly this kind of work in Tampa-area kitchens.
At Fenelon Handyman Services, we’ve installed our fair share of IKEA kitchens since 2014, from compact galley layouts in Clearwater condos to full-scale renovations in Land O’ Lakes. We know where people get stuck, what IKEA’s manuals leave out, and when it makes sense to call in help. This guide gives you the honest rundown so you can decide the best path forward for your project and your budget.
Before you start: plan, tools, and install costs
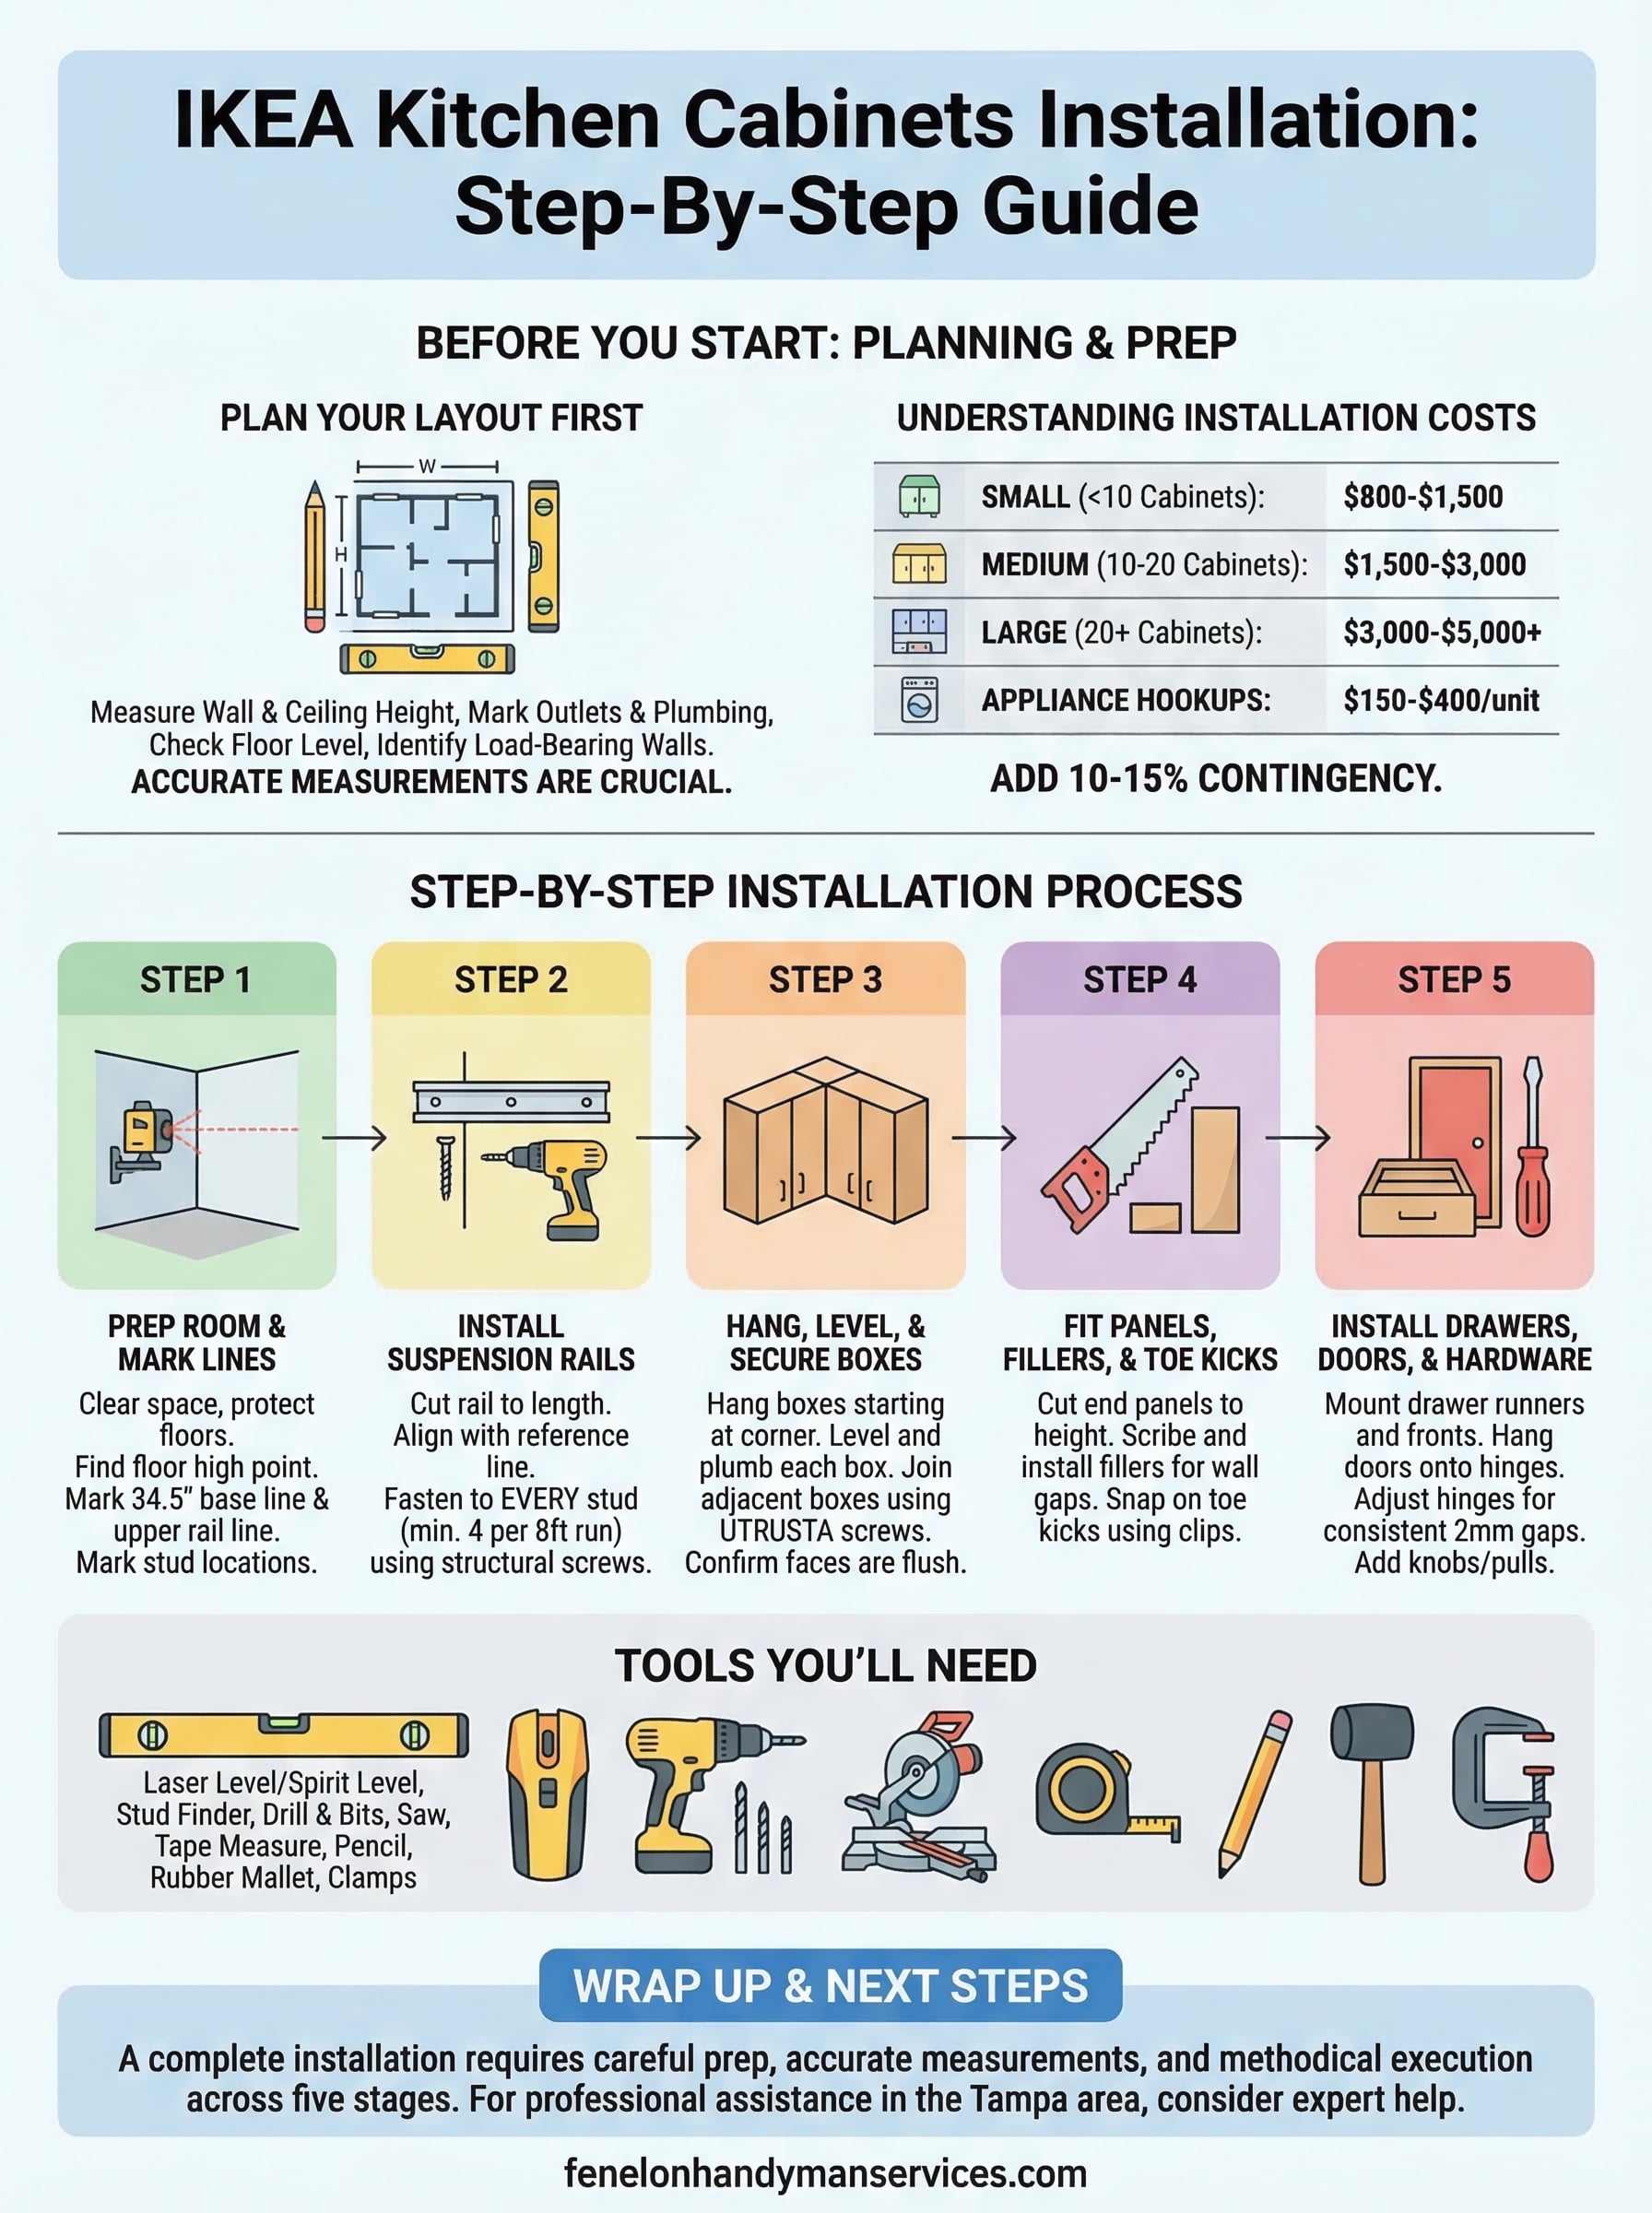
Good preparation saves you more time than any shortcut during the actual IKEA kitchen cabinets installation. Before you order a single flat-pack box, you need a clear layout, accurate measurements of your space, and a realistic sense of what the project will cost you. Getting these three things right upfront prevents the most common mistakes: ordering wrong sizes, missing hardware, and running out of budget mid-project.
Plan your layout first
IKEA offers a free online kitchen planning tool called IKEA Home Planner that lets you map out your cabinet configuration before you buy anything. Start by measuring your kitchen walls, noting the exact locations of windows, doors, outlets, and plumbing. Write every measurement down twice and verify them against each other before entering anything into the planner.
Work through this checklist before you place your order:
- Measure wall width and ceiling height at multiple points along each wall
- Mark the locations of all outlets, switches, and plumbing supply lines
- Identify which walls are load-bearing if you plan to remove anything
- Confirm whether your floor is level using a long level or laser level
- Note any soffits or bulkheads that could affect your upper cabinet height
If your floor varies by more than 3/4 inch across the kitchen, you need to account for that during the leg-leveling step. Ignoring it at the planning stage leads to visible gaps at the toe kick that are difficult to fix after installation.
Tools you’ll need
IKEA’s instruction manuals cover the basics, but a successful installation requires a specific set of tools that the manuals won’t always call out by name. Having everything on hand before day one means you won’t stop mid-install to make a hardware store run.
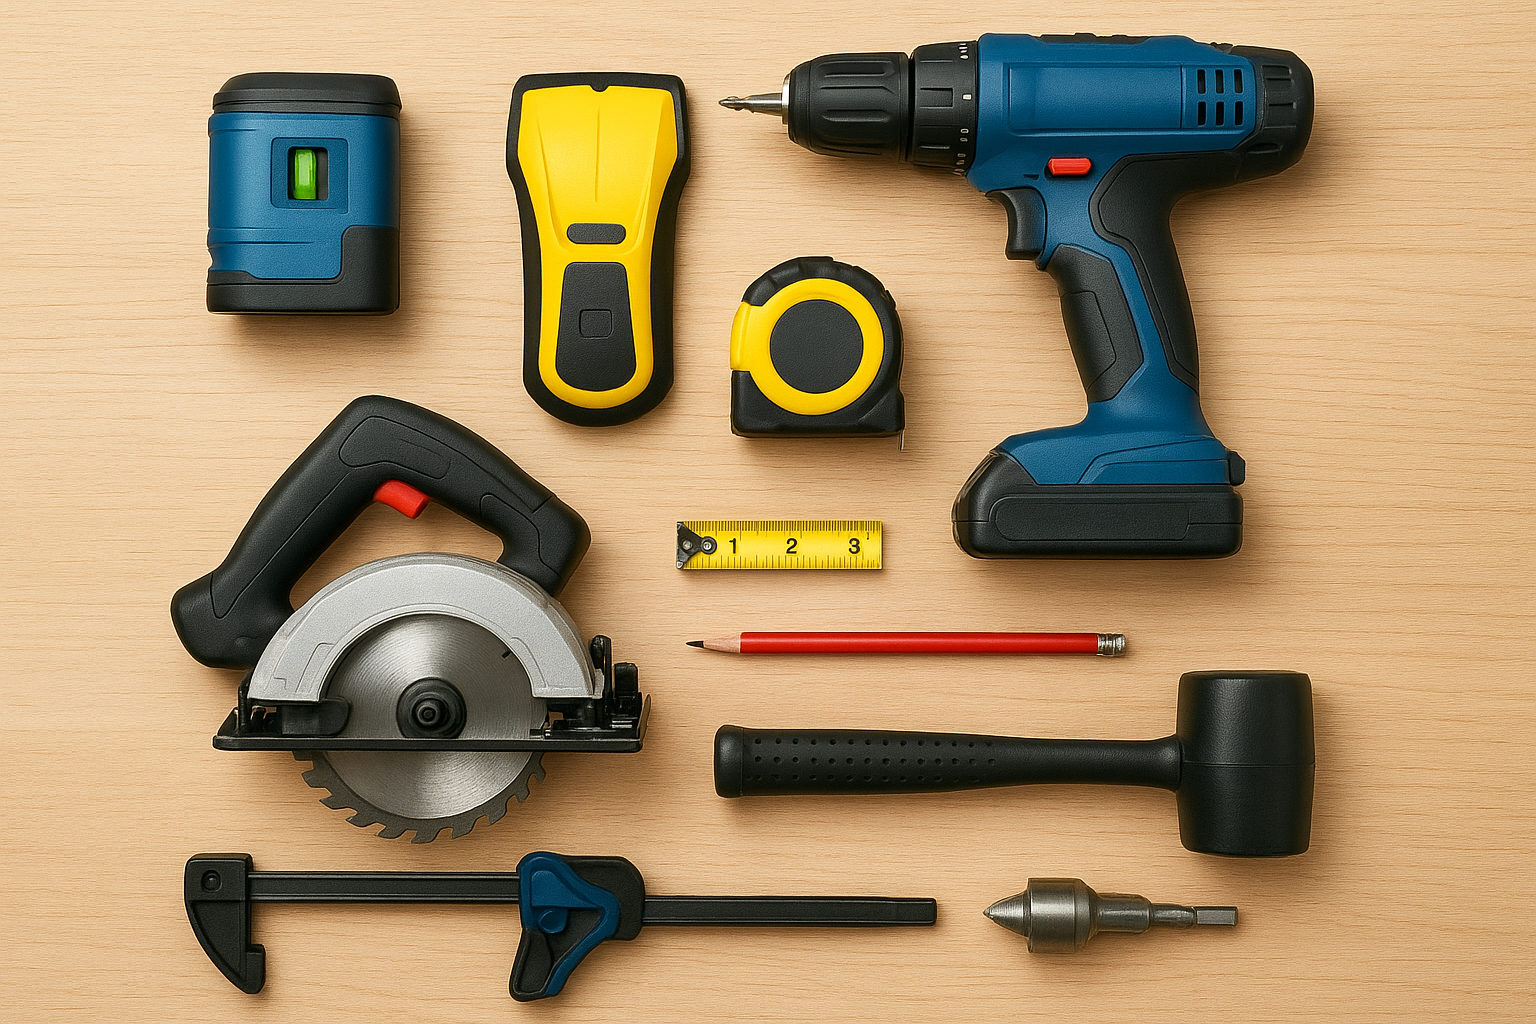
Here’s the full tool list:
| Tool | Purpose |
|---|---|
| Laser level or long spirit level | Setting accurate reference lines on your walls |
| Stud finder | Locating wall studs for rail anchoring |
| Drill with assorted bits | Driving screws into studs and wall materials |
| Miter saw or circular saw | Cutting fillers, toe kicks, and trim panels to size |
| Tape measure | Measuring throughout every stage of the install |
| Pencil | Marking reference lines and stud locations |
| Rubber mallet | Seating drawer runners and clips without damage |
| Clamps | Holding cabinet boxes together while you join them |
| Countersink bit | Creating clean screw entries on visible end panels |
Understanding installation costs
If you’re deciding between doing this yourself and hiring a professional, knowing the labor cost upfront shapes every other decision you make. IKEA offers installation through a third-party service, but many Tampa-area homeowners find that hiring a local handyman or contractor gives them better communication, faster scheduling, and more flexibility on scope.
Here’s a realistic breakdown of what professional IKEA kitchen cabinet installation costs:
| Scope | Estimated Labor Cost |
|---|---|
| Small kitchen (under 10 cabinets) | $800 – $1,500 |
| Medium kitchen (10 to 20 cabinets) | $1,500 – $3,000 |
| Large kitchen (20+ cabinets) | $3,000 – $5,000+ |
| Appliance hookups (per unit, if needed) | $150 – $400 |
These figures cover labor only and do not include the cost of the IKEA cabinet system itself, countertops, or appliances. Your total project budget should also include a 10 to 15% contingency for unexpected wall repairs, shimming, or structural surprises that only become visible once you start opening up the space.
Step 1. Prep the room and mark reference lines
Before any cabinet box touches a wall, you need a clean, empty workspace and a set of accurate reference lines drawn across your walls. This is the foundation step of any successful IKEA kitchen cabinets installation, and rushing it creates alignment problems that compound across every cabinet you hang. Take your time here; an hour of careful prep work saves you three hours of adjustments later.
Clear the space and protect surfaces
Remove everything from the kitchen that could get in the way: appliances, furniture, and anything stored in lower cabinets if you’re replacing an existing setup. Protect your floors with heavy-duty rosin paper or cardboard secured with painter’s tape, since cabinet boxes and tools will be sliding across the floor throughout the install.
Once the room is clear, inspect the walls for any damage that needs repair before you begin. Patch holes, fix loose drywall, and sand down any high spots that could prevent the suspension rail from sitting flush. A flat wall surface is non-negotiable for level cabinets.
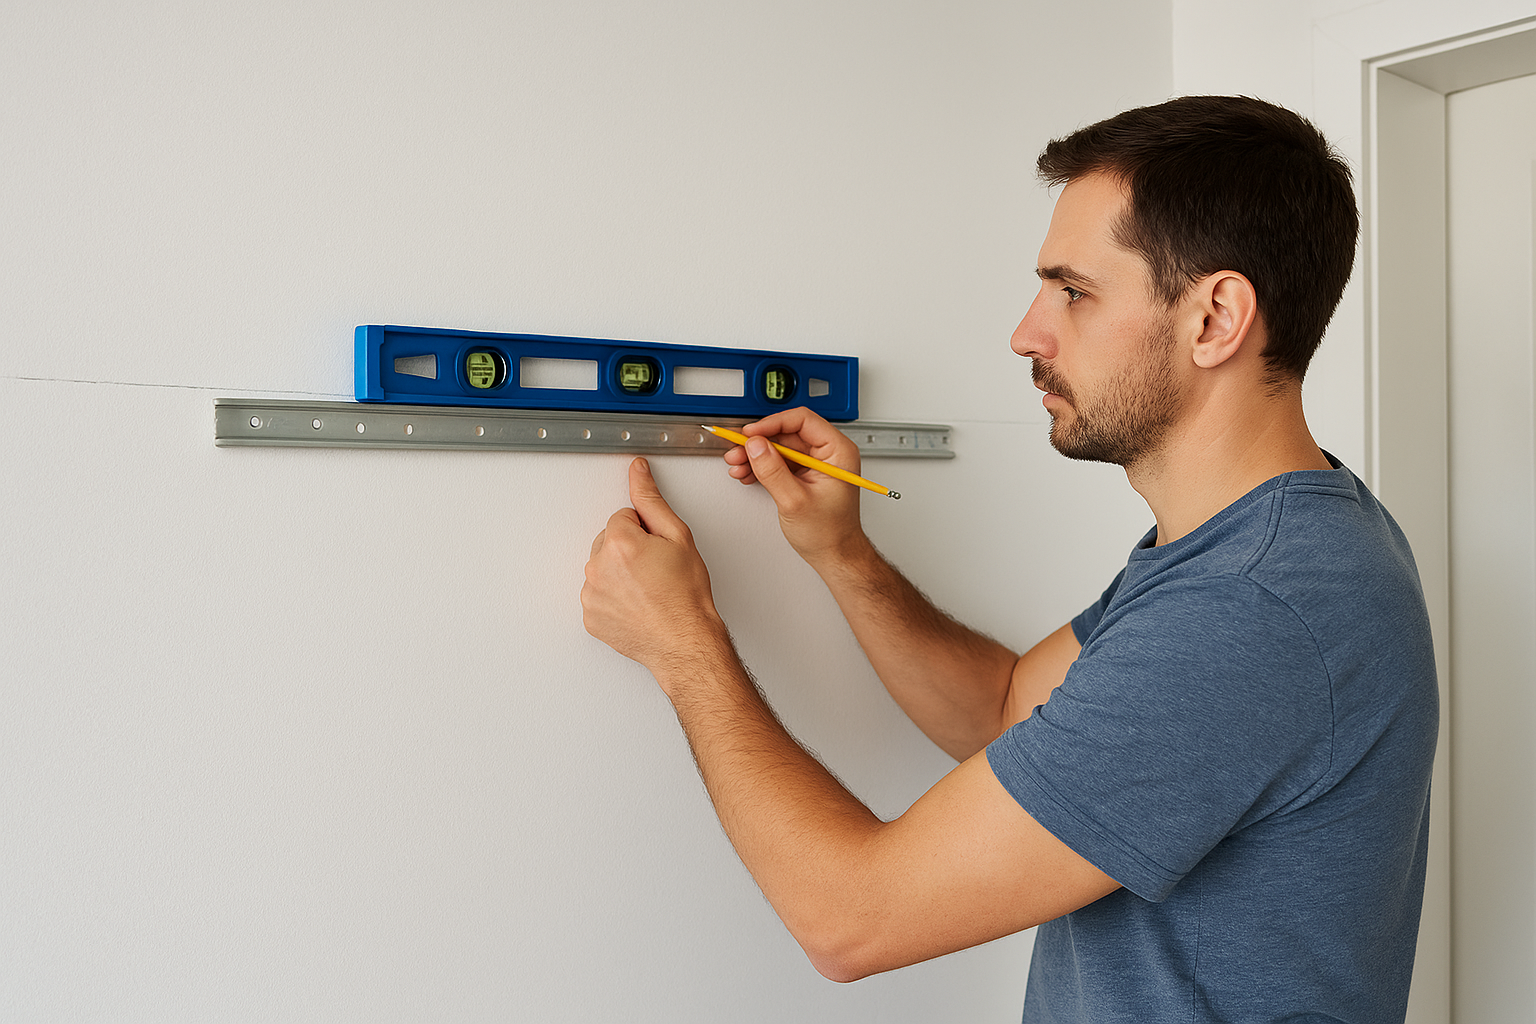
Find the high point and draw your reference lines
Start by finding the highest point of your floor using a long spirit level or a laser level set to a horizontal plane. Walk the level across the entire floor perimeter and mark the highest spot with a pencil. This point becomes the anchor for all your measurements going up the wall.
From the floor’s high point, measure up 34.5 inches for your base cabinet reference line. This accounts for the standard 34.5-inch cabinet height, which leaves room for a countertop to sit at the industry-standard 36-inch finished height. For upper cabinets, measure up from your base line to determine where your suspension rail will sit, typically 54 inches from the floor high point for standard 30-inch uppers.
If you’re installing a combination of 30-inch and 36-inch upper cabinets, set your rail height based on the taller cabinet so the tops stay consistent across the row.
Use a laser level to extend your reference lines across the full length of each wall. Mark your stud locations with vertical pencil lines at this stage so you don’t have to re-find them later. Write the stud centerpoints directly on the wall inside the cabinet run where they’ll be hidden once the install is complete.
Step 2. Install the suspension rails
The suspension rail is the backbone of your upper cabinet run, and getting it level and anchored into studs is the most critical single task in the entire IKEA kitchen cabinets installation process. IKEA’s SEKTION system uses a continuous metal rail that all upper cabinet boxes hang from, which means any error here gets multiplied across every cabinet in the row. Work carefully, and verify level twice before you drive a single screw.
Cut and position the rail
IKEA ships the suspension rail in standard lengths, so you’ll likely need to cut it down to match your upper cabinet run. Use a hacksaw or metal-cutting blade to trim the rail to the exact length of your cabinet run. File down any sharp edges after cutting so the rail sits flush and doesn’t snag during hanging.
Hold the rail up to your wall reference line and confirm it aligns with the upper cabinet height mark you drew in Step 1. The rail should sit so that the top edge lands precisely on your reference line. Have a helper hold it in place while you confirm alignment with your laser level before marking your screw points.
Fasten the rail to studs
Every screw that attaches the rail to the wall must hit a stud. Drywall anchors alone cannot support the weight of loaded kitchen cabinets. Use the stud locations you marked in Step 1 and drive at least one screw into every stud your rail crosses. For a typical 8-foot cabinet run, you should hit a minimum of four studs.
Use 3-inch cabinet screws rated for structural use. If a stud falls in an awkward spot near the rail’s cut edge, add a backing board behind the drywall rather than skipping that anchor point.
If you’re working with a masonry or tile wall, switch to masonry anchors and a hammer drill. Standard wood screws won’t hold.
After you’ve driven all screws, run your level along the rail one final time to confirm it hasn’t shifted. Push up gently on the rail at several points to test that it’s completely rigid against the wall. A properly installed rail should show zero flex when you apply upward pressure with both hands.
Step 3. Hang, level, and secure cabinet boxes
With your rail firmly in place, you can start hanging cabinet boxes. This is the stage where IKEA kitchen cabinets installation starts to look like a real kitchen, but it’s also where small alignment errors get locked in permanently if you don’t catch them early. Work from a corner outward, and treat every cabinet as a checkpoint to verify the position of the one before it.
Hang the first cabinet box
Start at an inside corner or at the most visible end of your upper cabinet run. Hook the cabinet’s mounting brackets onto the suspension rail and slide it into position. The SEKTION system lets you adjust each cabinet horizontally along the rail, so you don’t need to land it perfectly on the first hook. Get the box close to its final position, then step back and confirm the placement looks right before making fine adjustments.
Check the box for plumb on both its side faces using a small level. If the cabinet tilts forward or backward, adjust the mounting bracket depth using the adjustment screw at the top rear of the box. A single turn shifts the tilt noticeably, so make small corrections and re-check after each one.
Level and join the boxes
Once your first box is level and plumb, hang the adjacent cabinet and align its face to match the first one. Both front faces should sit in the same vertical plane, with no cabinet stepping forward or back from its neighbor. Hold a straightedge or level across both face frames to confirm this before clamping them together.
Joining cabinets before confirming their faces are flush is the most common mistake at this stage. Fix the alignment first, then clamp.
Use the IKEA UTRUSTA joining screws to connect the side walls of adjacent boxes. Drill a small pilot hole through both side walls at the top and bottom front corners, then drive the joining screws until snug. Avoid overtightening, since that can bow the cabinet walls inward and create door-alignment problems later. Once all boxes in the run are joined, push firmly on each one to confirm that the rail connection holds solid before you move on to hanging your lower base cabinet boxes.
Step 4. Fit panels, fillers, toe kicks, and trim
Finishing the cabinet boxes with panels, fillers, and toe kicks is what separates a professional-looking IKEA kitchen cabinets installation from one that looks like flat-pack furniture. These components close the visible gaps between cabinets and walls, cover raw edges, and give the whole run a built-in appearance. Measure each piece twice before cutting, since most of these parts are visible and mistakes mean ordering replacements.
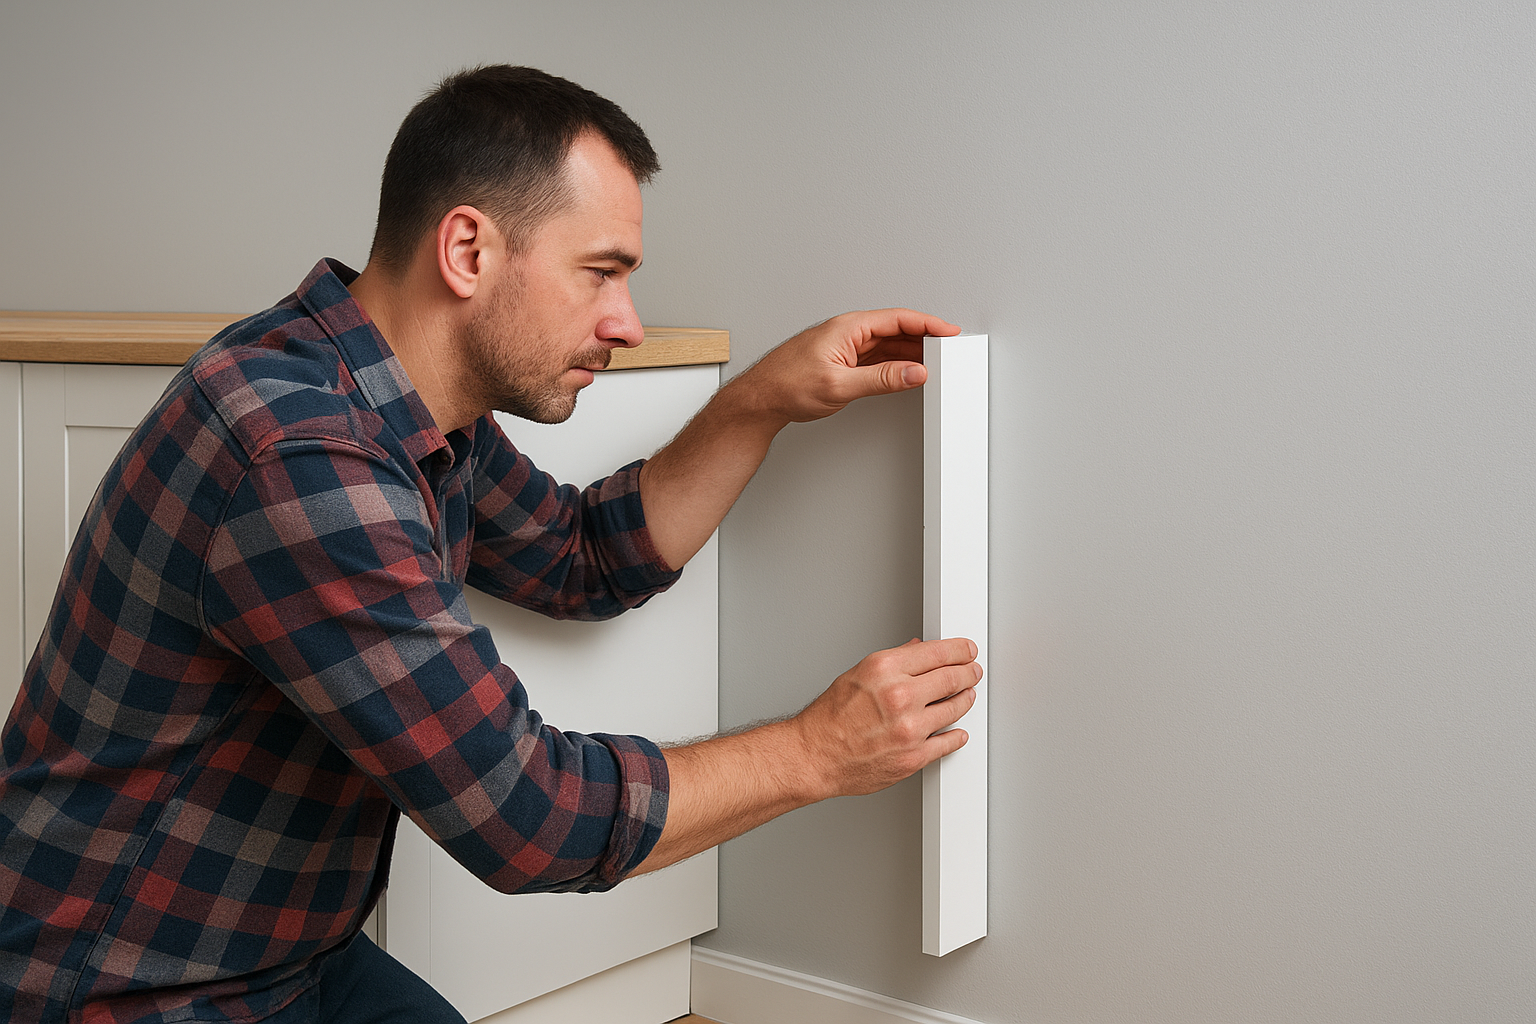
Cut and attach end panels
End panels cover the exposed side walls of the outermost cabinet boxes in a run. IKEA SEKTION end panels come in standard heights that you trim to fit your specific ceiling height or soffit height. Measure from the top of the cabinet box down to the floor, subtract the toe kick height (typically 4.5 inches), and cut your panel to that dimension using a miter saw or circular saw.
Attach the end panel to the cabinet box using the pre-drilled holes and panel clips IKEA includes in the hardware pack. Position the panel flush with the cabinet face frame and drive the clips into place with a rubber mallet. Run your hand along the seam between the panel and the cabinet face to confirm they sit in the same plane before the clips fully seat.
Install fillers to close wall gaps
Fillers bridge the space between the edge of a cabinet box and an adjacent wall. Cut each filler from the matching cabinet material so it blends into the run. Measure the gap at the top, middle, and bottom of the opening, since walls are rarely perfectly straight, and cut to the narrowest measurement so the filler fits without bowing.
Scribe the wall side of the filler with a compass set to the gap width, then trim along that line with a jigsaw for a tight fit against an uneven wall.
Set the toe kick
The toe kick snaps onto the cabinet legs using the plastic clips IKEA includes with the SEKTION base cabinets. Cut the toe kick panel to length, then press each clip onto the leg at the same height so the panel sits level across the full run. Hold a level across the toe kick face after snapping it in to confirm it doesn’t dip or bow before moving on to the next step.
Step 5. Install drawers, doors, and hardware
Drawers and doors are the most visible part of your finished IKEA kitchen cabinets installation, and they’re also the most adjustable. IKEA builds a generous amount of fine-tuning into every hinge and runner, which means you don’t need to get things perfect on the first try. Work through each component methodically, and save final adjustments for after all doors and drawers are hung so you can compare alignment across the full run.
Mount the drawer runners and install the fronts
Start by snapping the IKEA MAXIMERA or UTRUSTA drawer runners into the pre-drilled holes inside each base cabinet box. The runners click in at a fixed height, so there’s no measurement involved. Slide each drawer box onto its runners and push it firmly until you hear it click into the fully-seated position.
Once the drawer box is in, attach the drawer front using the two adjustment screws located behind the front face. Hold the drawer front in position against the box, press the clips to lock it temporarily, then check the gap between it and the adjacent door or drawer front. You want a consistent 2mm gap on all sides.
Small gap inconsistencies are easier to fix now than after you’ve tightened everything down, so take the time to compare each drawer front against its neighbors before locking the clips.
Hang the doors and dial in the hinges
Clip each door onto its pre-installed IKEA hinge plates by pressing the hinge arm into the plate until it snaps. Every IKEA hinge gives you three axes of adjustment: depth, height, and side-to-side. Use a Phillips screwdriver to turn each adjustment screw in small increments, checking the reveal between doors after each turn.
Work across the full cabinet run rather than perfecting one door at a time. Stand back after every few adjustments to check that the door tops and bottoms form consistent horizontal lines across the row. Once doors are aligned, attach any remaining hardware like pulls or knobs using a hardware jig to keep the placement uniform. A jig is simply a piece of scrap wood with a hole drilled at your chosen handle position, held against each door face as a drilling template.
Wrap up and next steps
A complete IKEA kitchen cabinets installation moves through five distinct stages: planning your layout, marking reference lines, mounting the suspension rail, hanging and joining cabinet boxes, and finishing with panels, doors, and hardware. Each step builds directly on the one before it, so accurate prep work and careful measurements at the start pay off in a clean, level result at the end.
If you’ve read through this guide and decided the project is more involved than you want to take on yourself, that’s a completely reasonable call. Hanging cabinets level, managing wall imperfections, and scribing fillers to uneven surfaces are skills that take time to develop, and one miscalculation can cost you more to fix than the labor would have cost upfront. The Fenelon team has installed IKEA kitchens across Tampa since 2014 and can handle every part of the process for you. Get a free quote for your kitchen project and we’ll walk you through your options.